Where can you access all the modules?
This is the Sidebar. This contains various buttons that will lead you to different pages that will contain functions that it is related to.
We have the sidebar buttons:
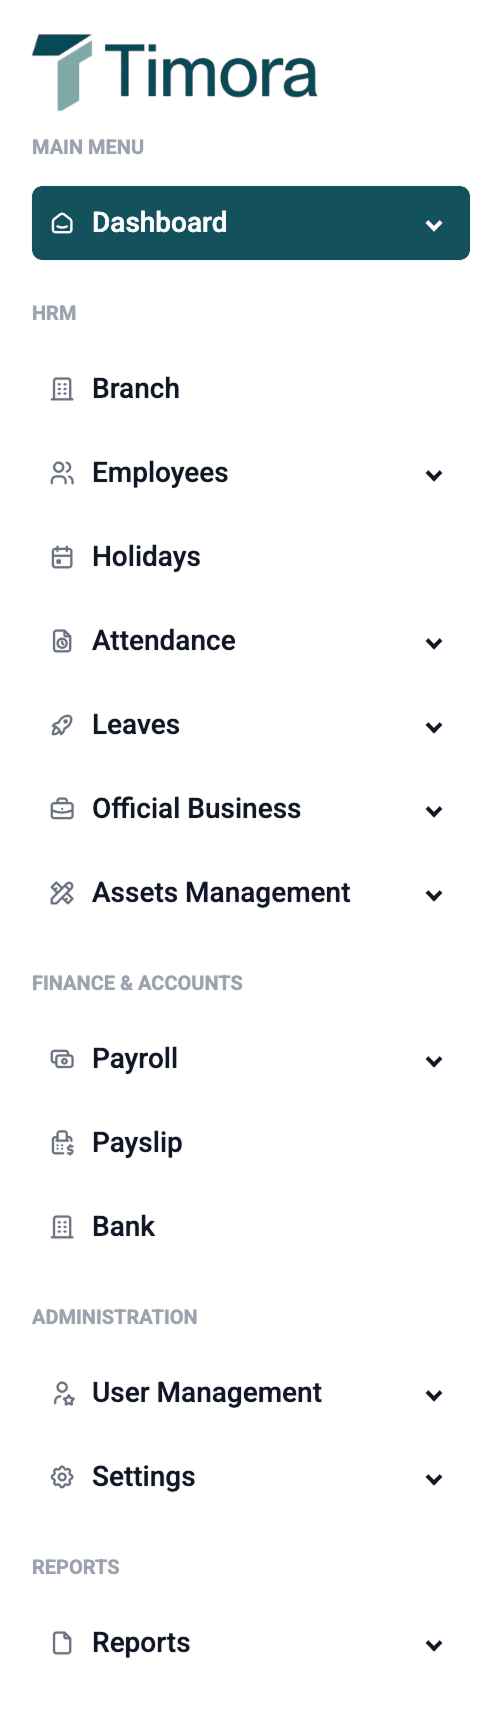
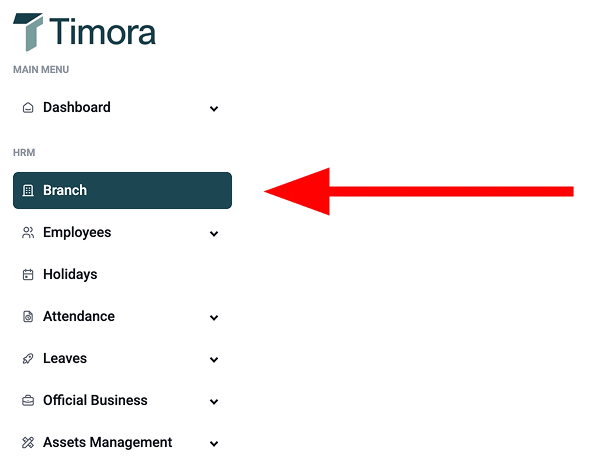
- Branch - This is where you Create a Branch
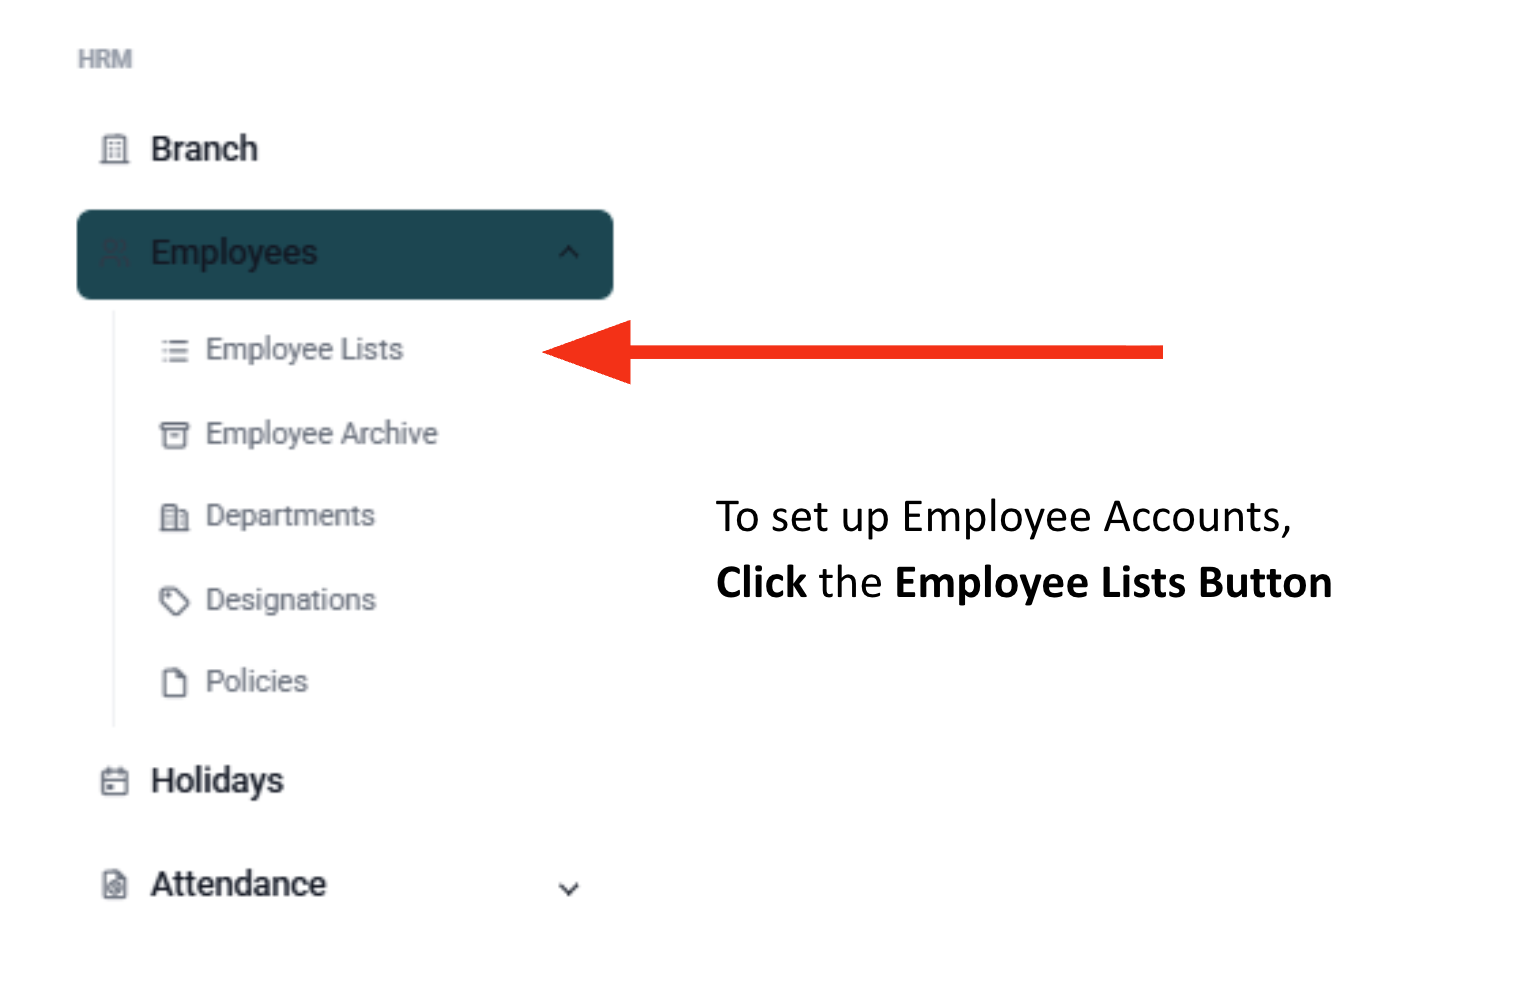
- Employees - This is where you Handle Employee Accounts
- Holidays - This is where you Add Holiday Dates and Holiday Exceptions
- Attendance - This is where you can Edit Attendance information
- Leaves - This is where you Handle Leave related Information
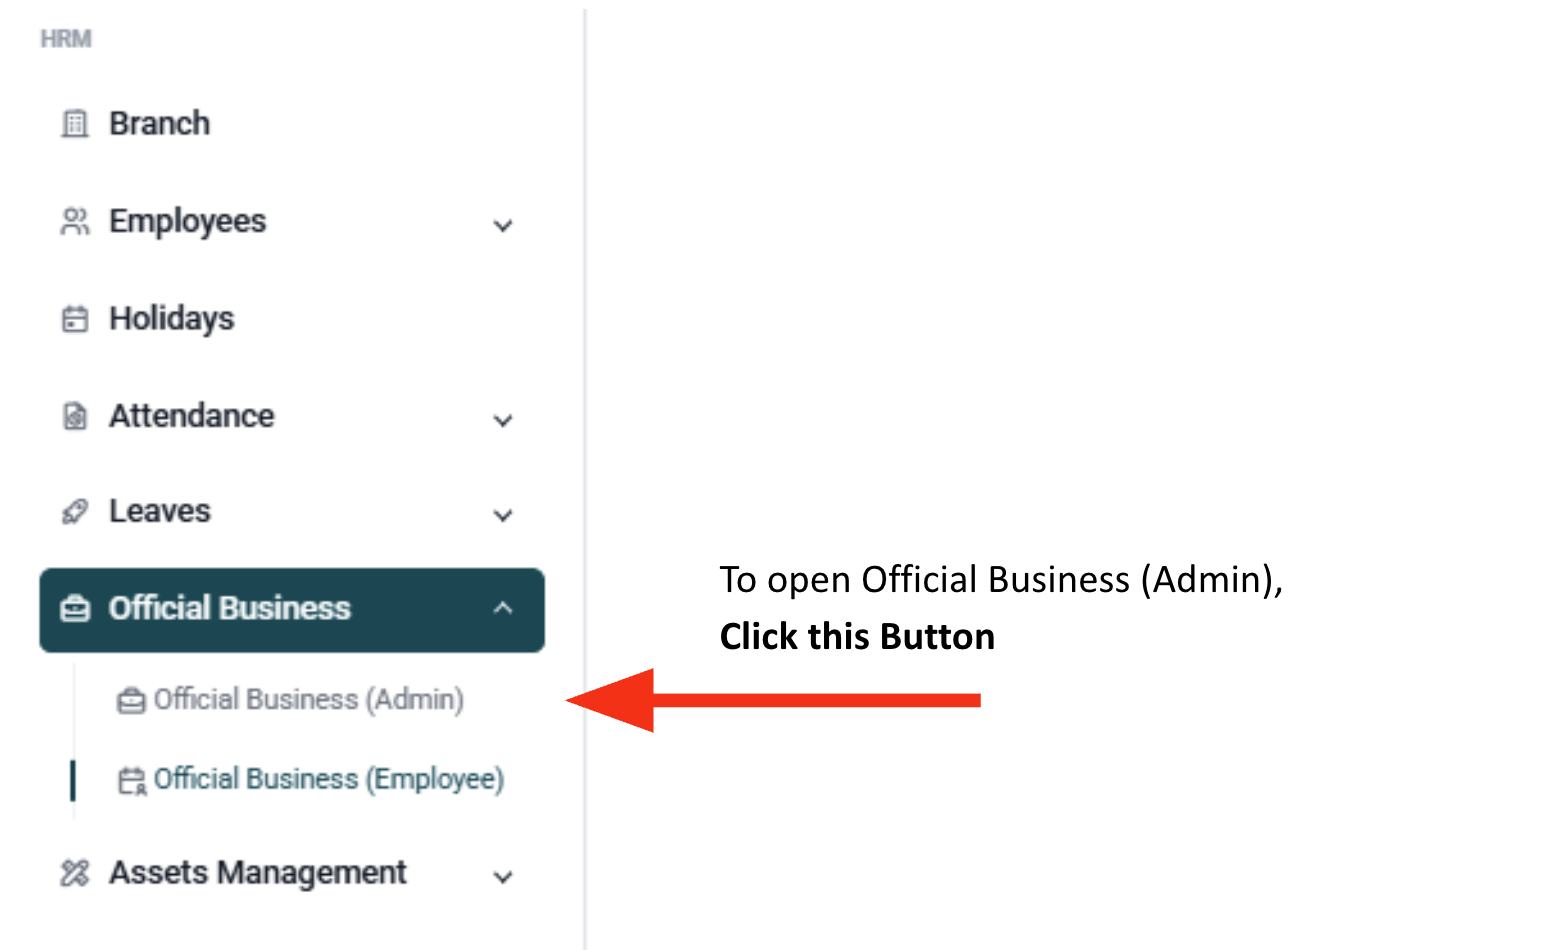
- Official Business - This is where users can Approve/Reject Official Business Requests
- Assets Management - This is where you can Control Assets
- Payroll - This is where you can Issue Payroll related Tasks
- Payslip - This is where users can View their own Payslips
- Bank - This is where you can Connect Your Bank Information
- User Management - This is where you can Control User Roles
- Settings - This is where you set up Attendance Settings, Approval Settings, Leave Types, Custom Fields (Prefix), and ZKTeco Biometrics
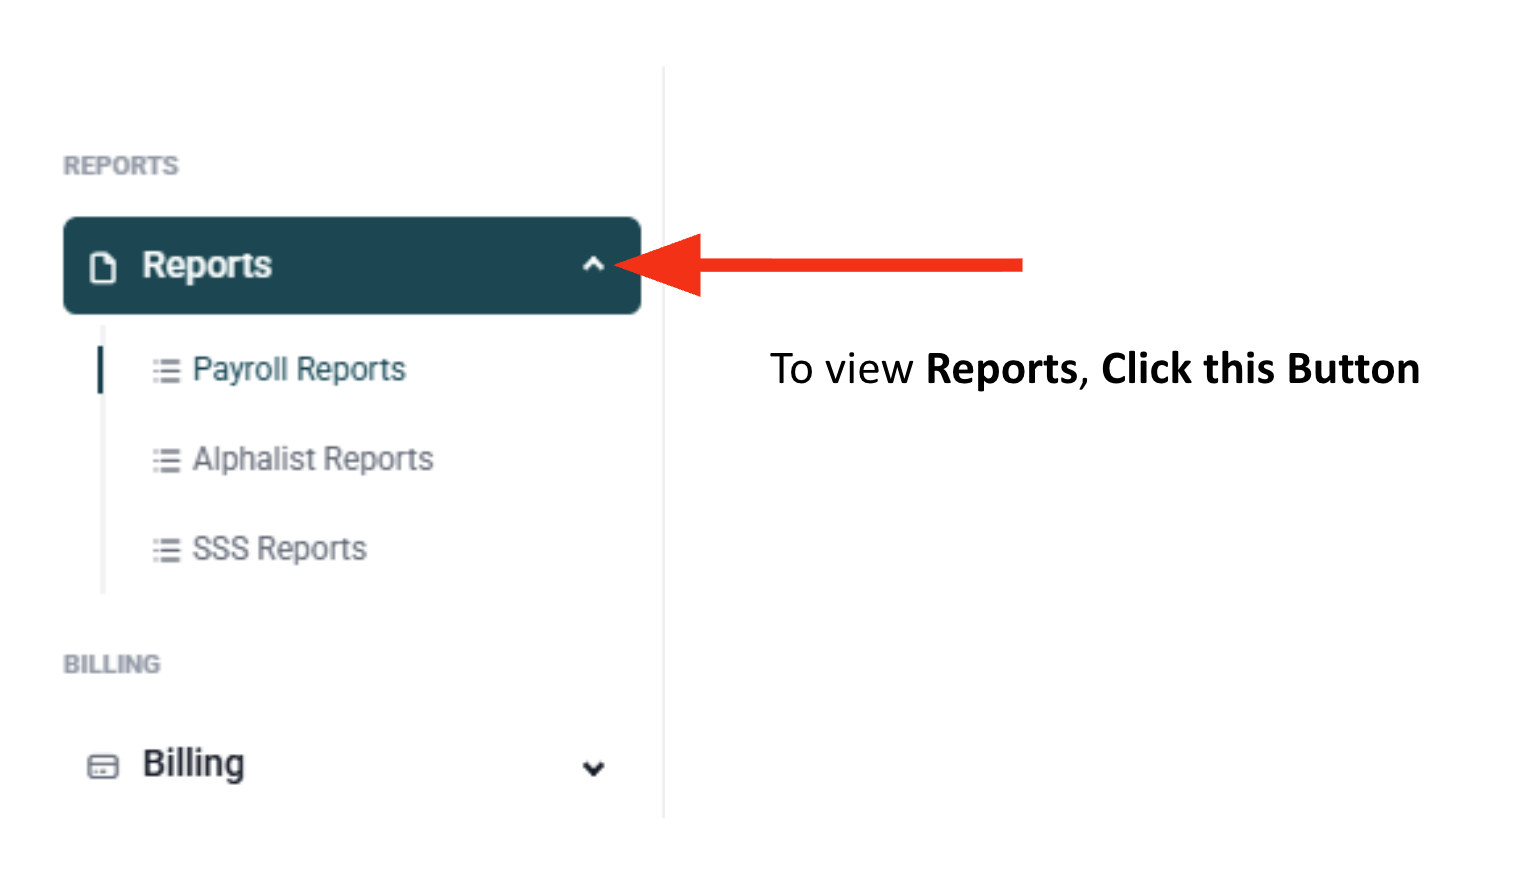
- Reports - This is where you can find Payroll Reports, Alphalist Reports, and SSS Reports
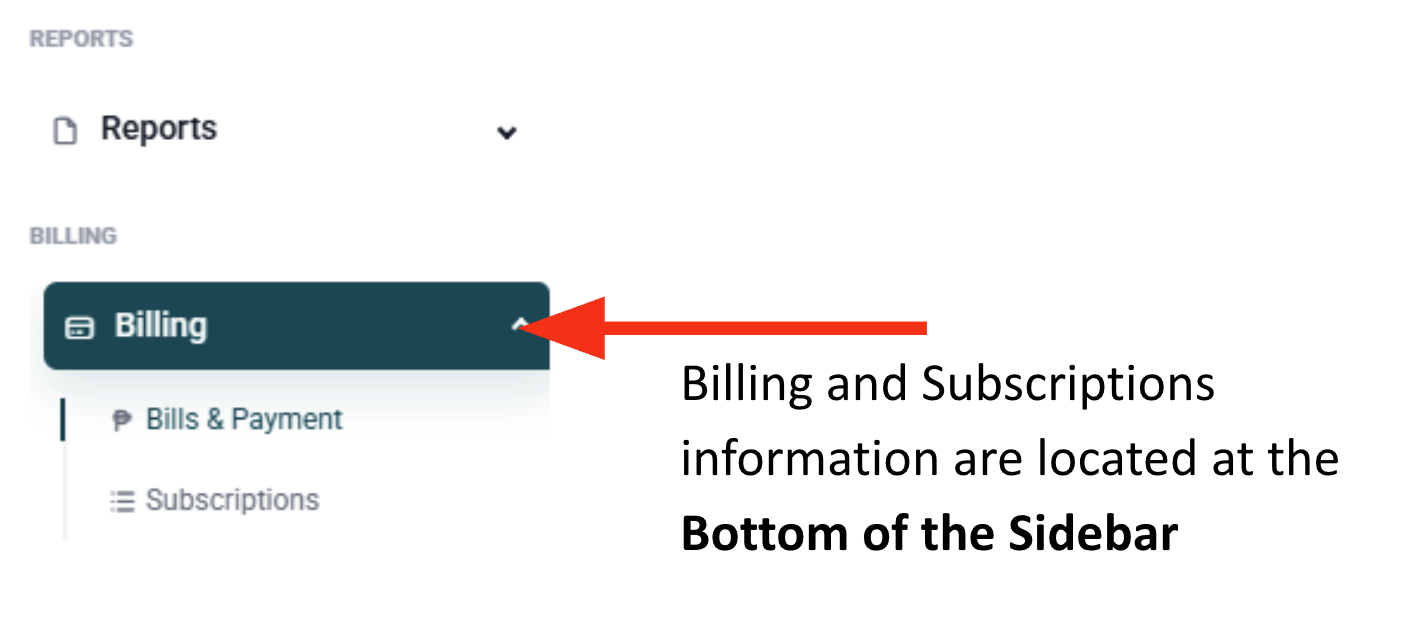
- Billing - This is where you can View Bills & Payments and Subscription & Plans
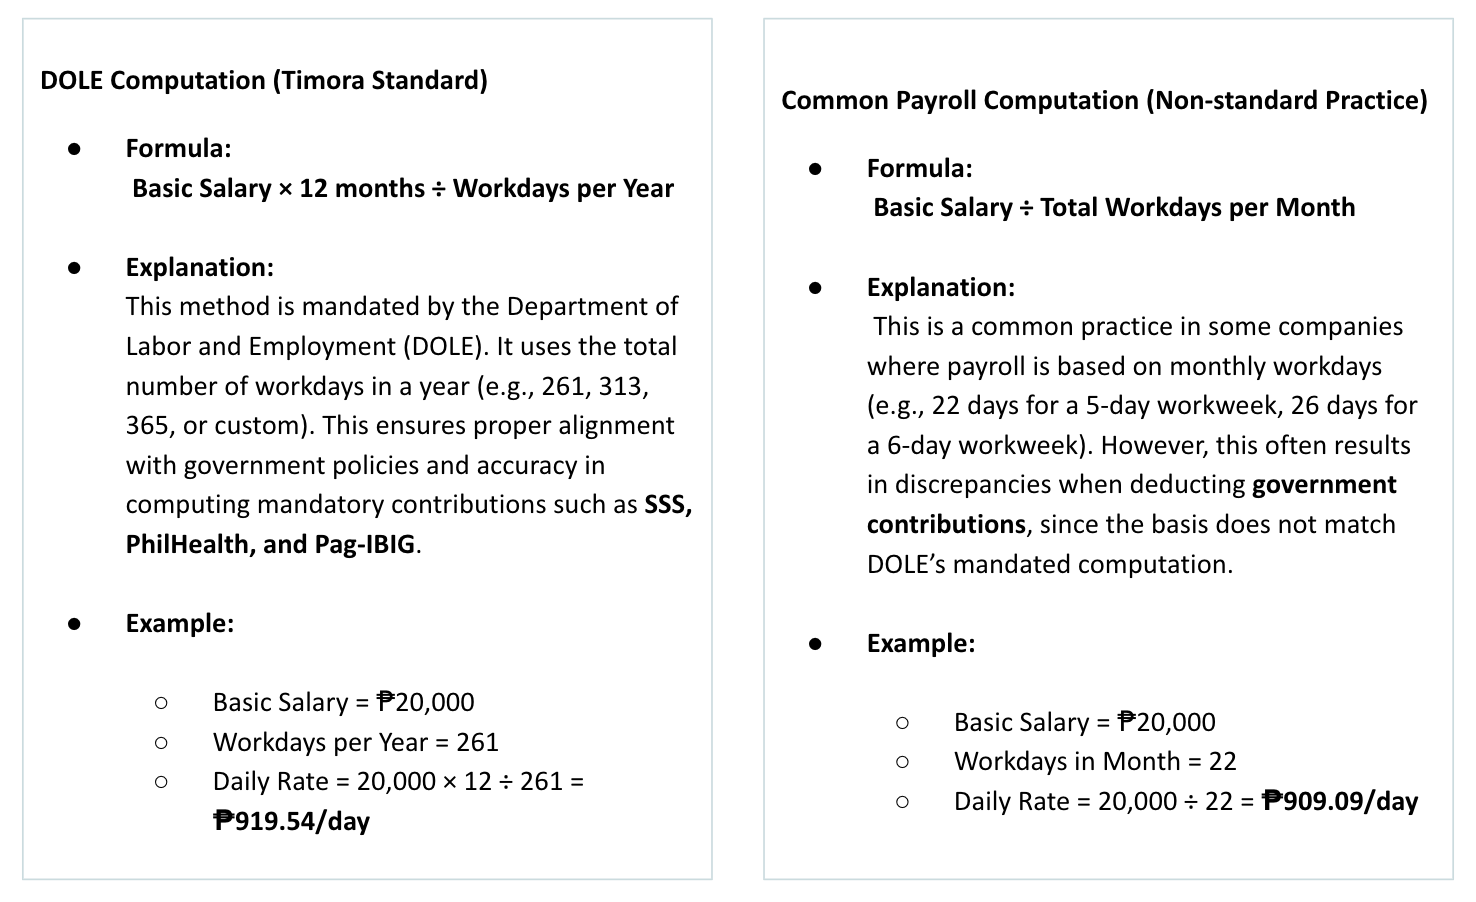
Salary computation in Timora Portal
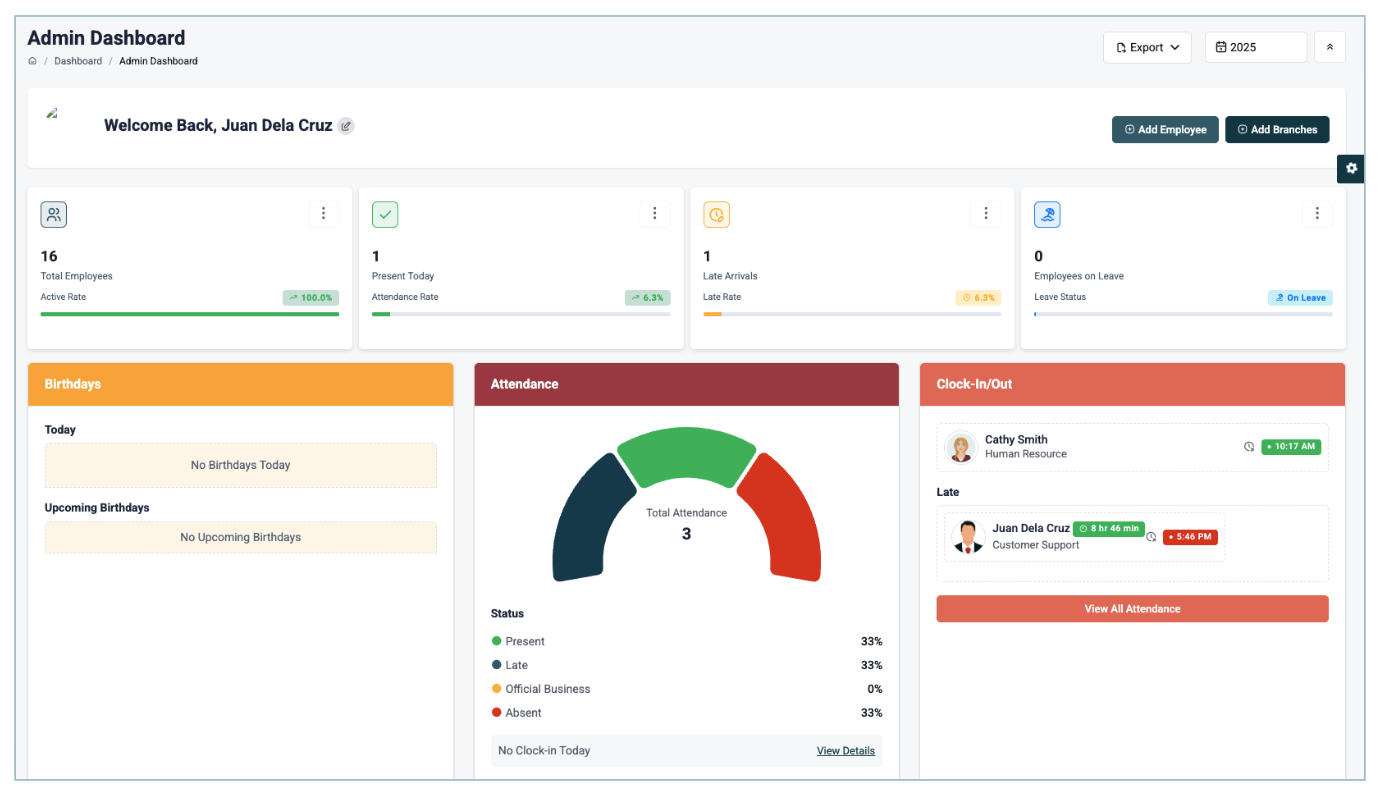
What are in the admin & employee dashboard?
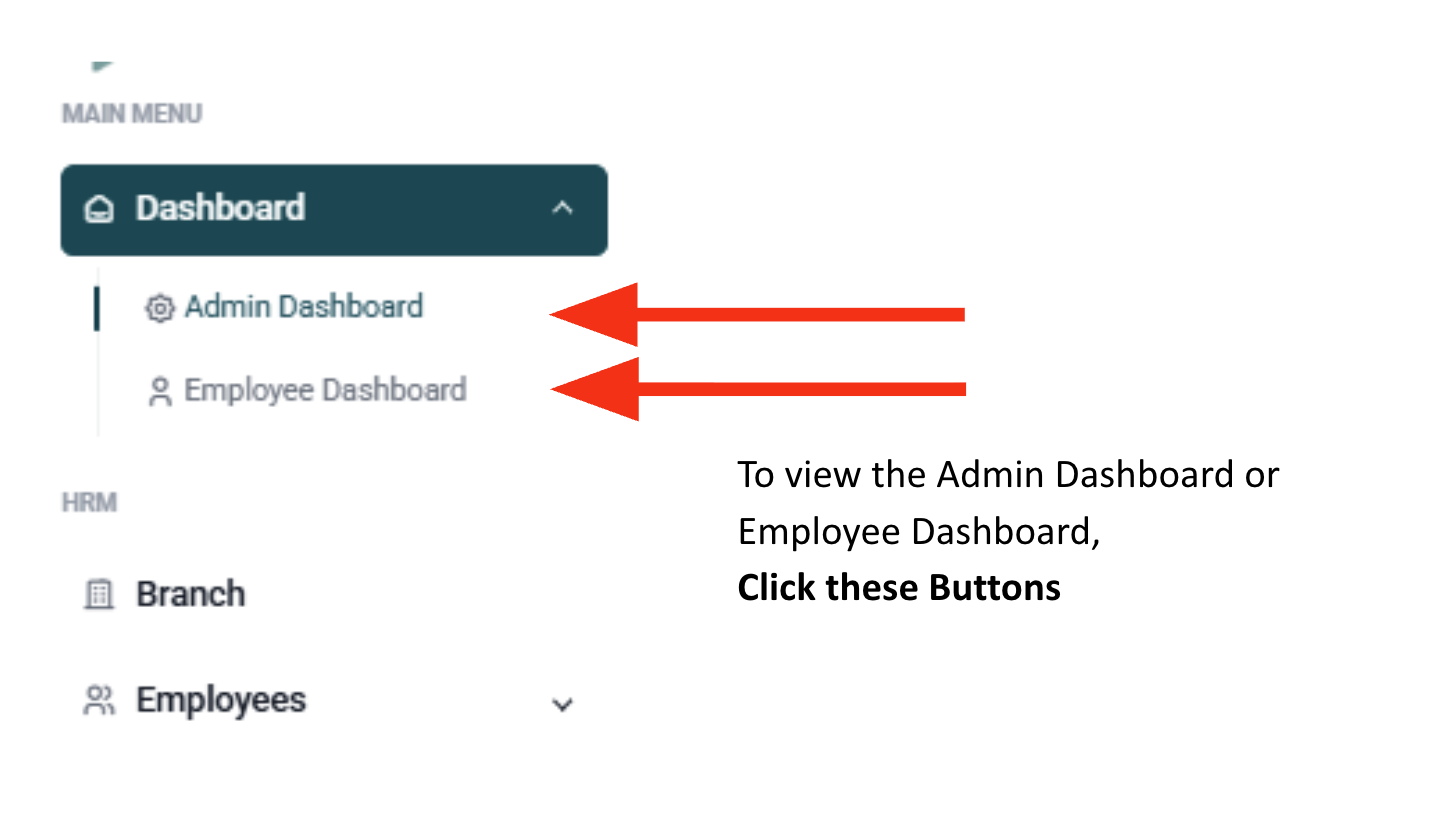
Admin Dasboard - Provides a quick overview of key company metrics, including:
- Total employees
- Employees on leave
- Team birthdays
- Attendance overview
- Payroll summary
- Overtime statistics
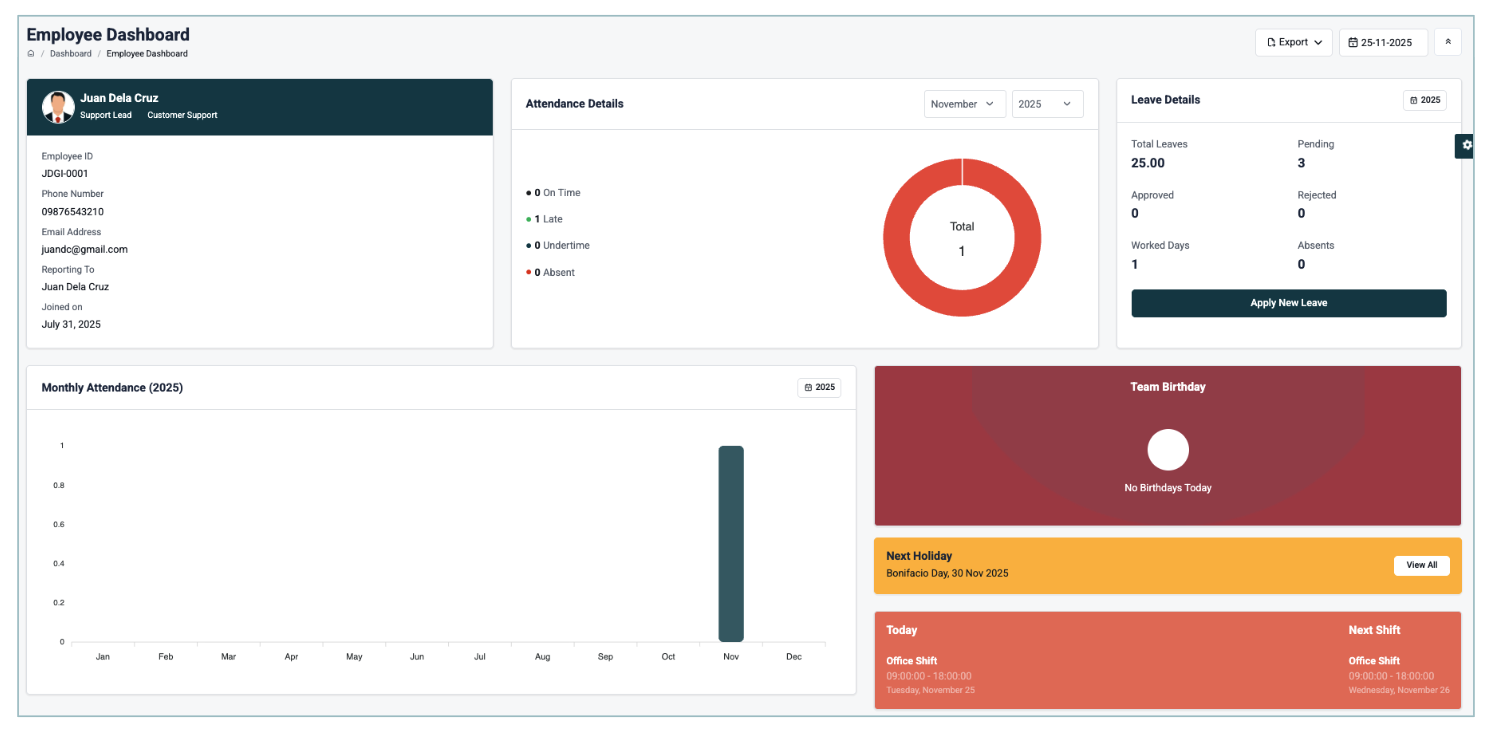
Employee Dashboard - Displays employee-specific details such as:
- Personal information
- Attendance records
- Leave credits
- Monthly attendance summary
- Team birthdays
- Upcoming holidays
- Current and next day shift schedule
How to setup branch?
1. Upon logging-in Click the Branch Sidebar Button to proceed.
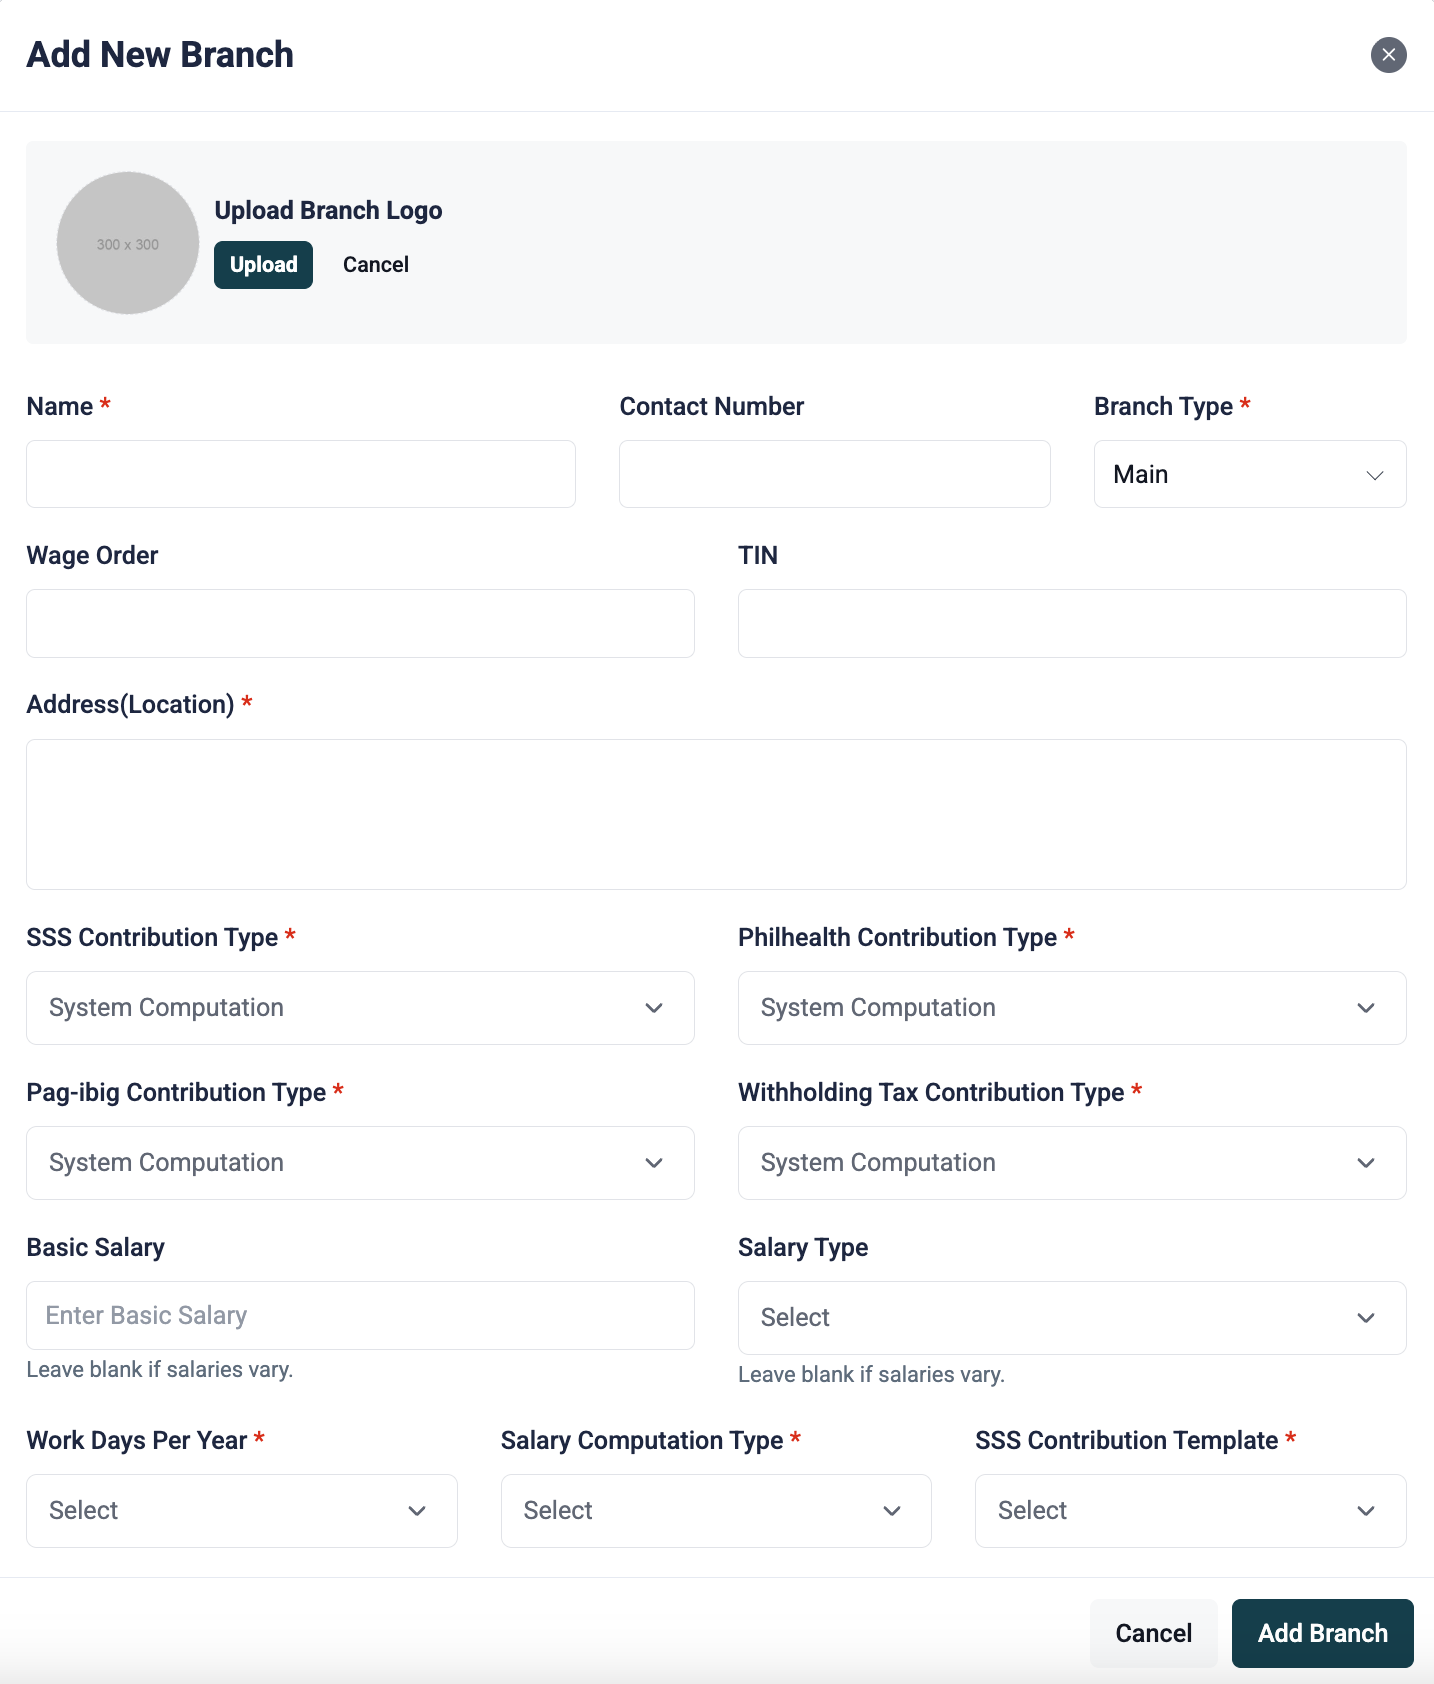
2. Branches are used to define salary breakdowns and system computations.
1. Add your company name, contact number, and upload your company logo (this will appear on payslips).
2. Choose a contribution type:
a. System Computation – follows DOLE regulations
b. Fixed – if you have fixed contribution amounts
c. Manual – entered manually per employee (201 file)
d. None – no contributions/deductions
3. Define workdays per year (e.g., 313, 261, 300, 365, or custom).
4. Select salary computation type: semi-monthly, monthly, bi-weekly, or weekly.
How to setup leave types?
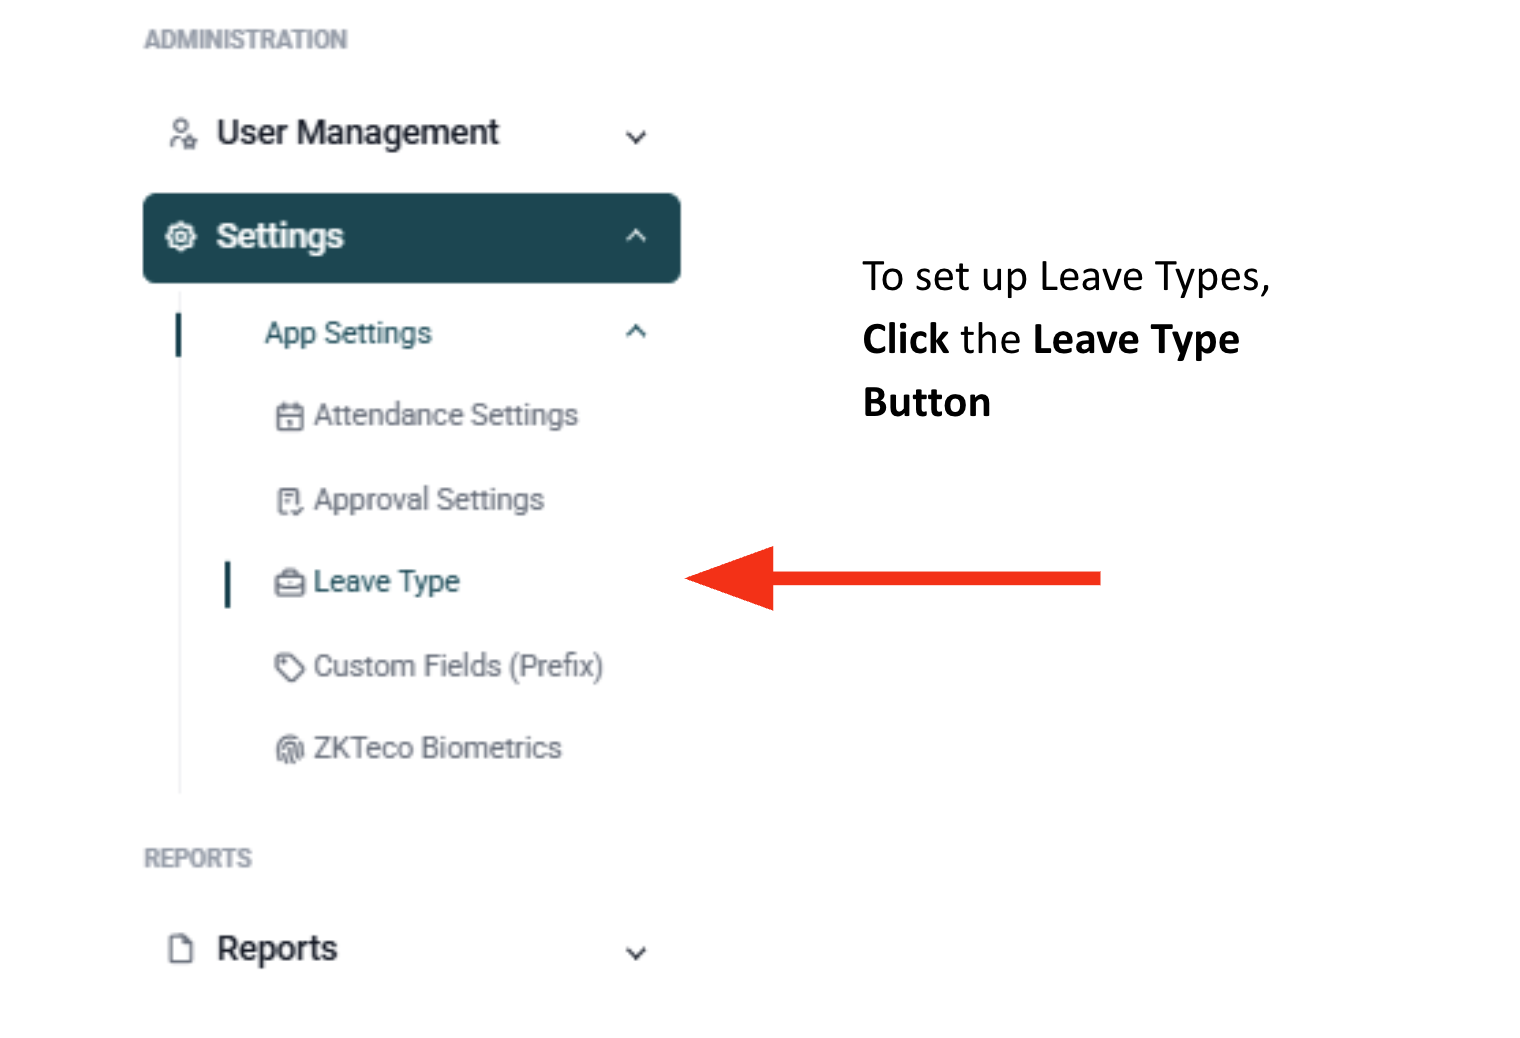
Configure company leave policies:
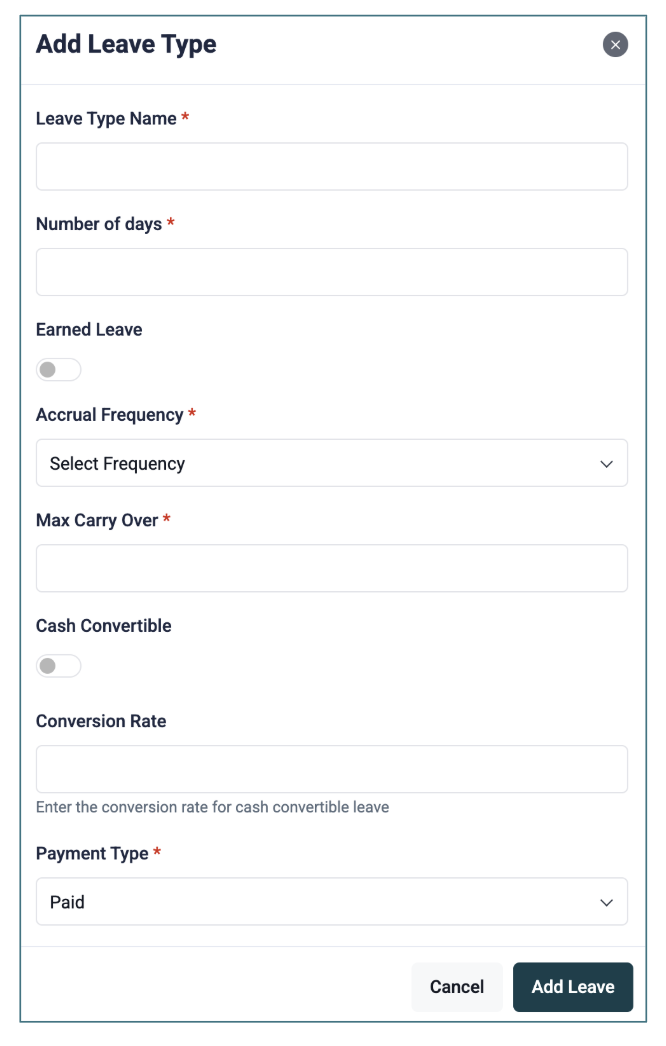
- Earned leave and cash-convertible options
- Annual leave credits (customizable)
-
Policy options:
- Advance notice period (set number of days)
- Half-day leave (first half or second half)
- Backdated filing (set allowable days)
- Required attachments (e.g., medical certificates)
Admins can override leave credits per employee when adjustments are needed.
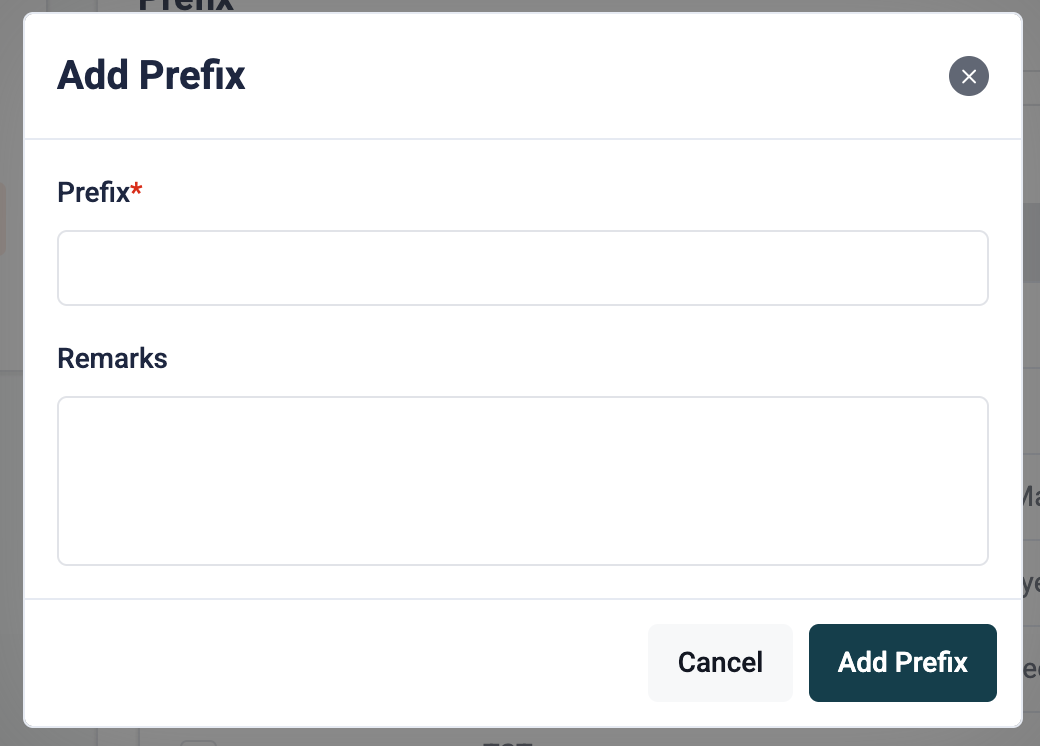
How to setup company prefix?
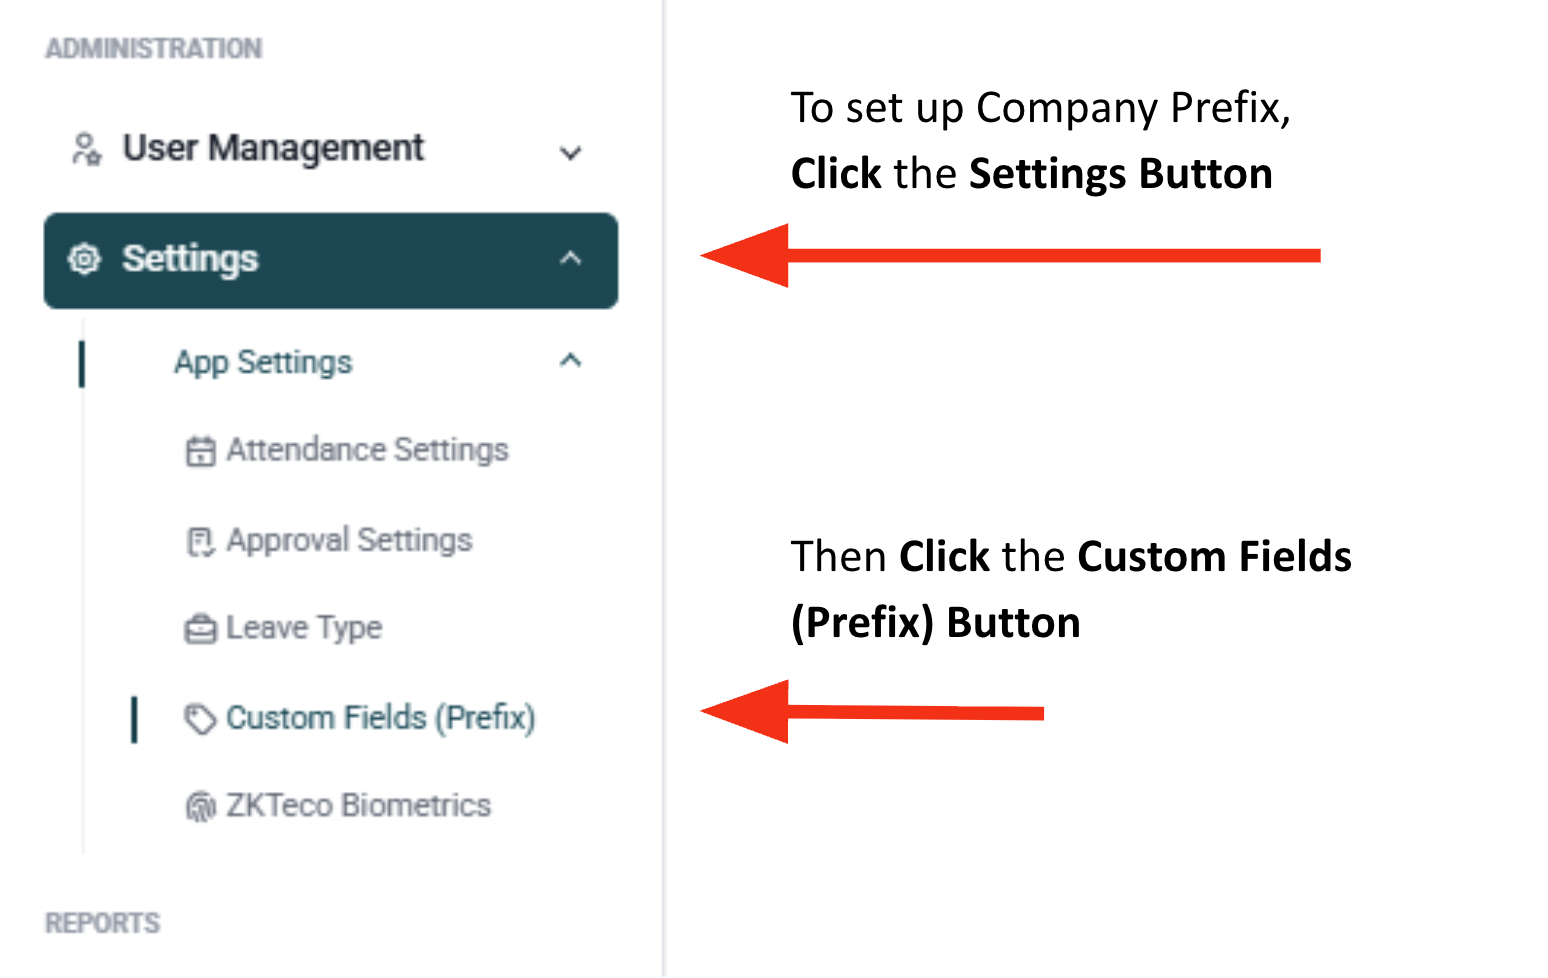
Set a prefix for employee IDs. This automates ID creation and integrates with biometric devices.
eg.Company Name = COMP
JAF DIGITAL GROUP INC = JDGI
How to setup attendance settings?
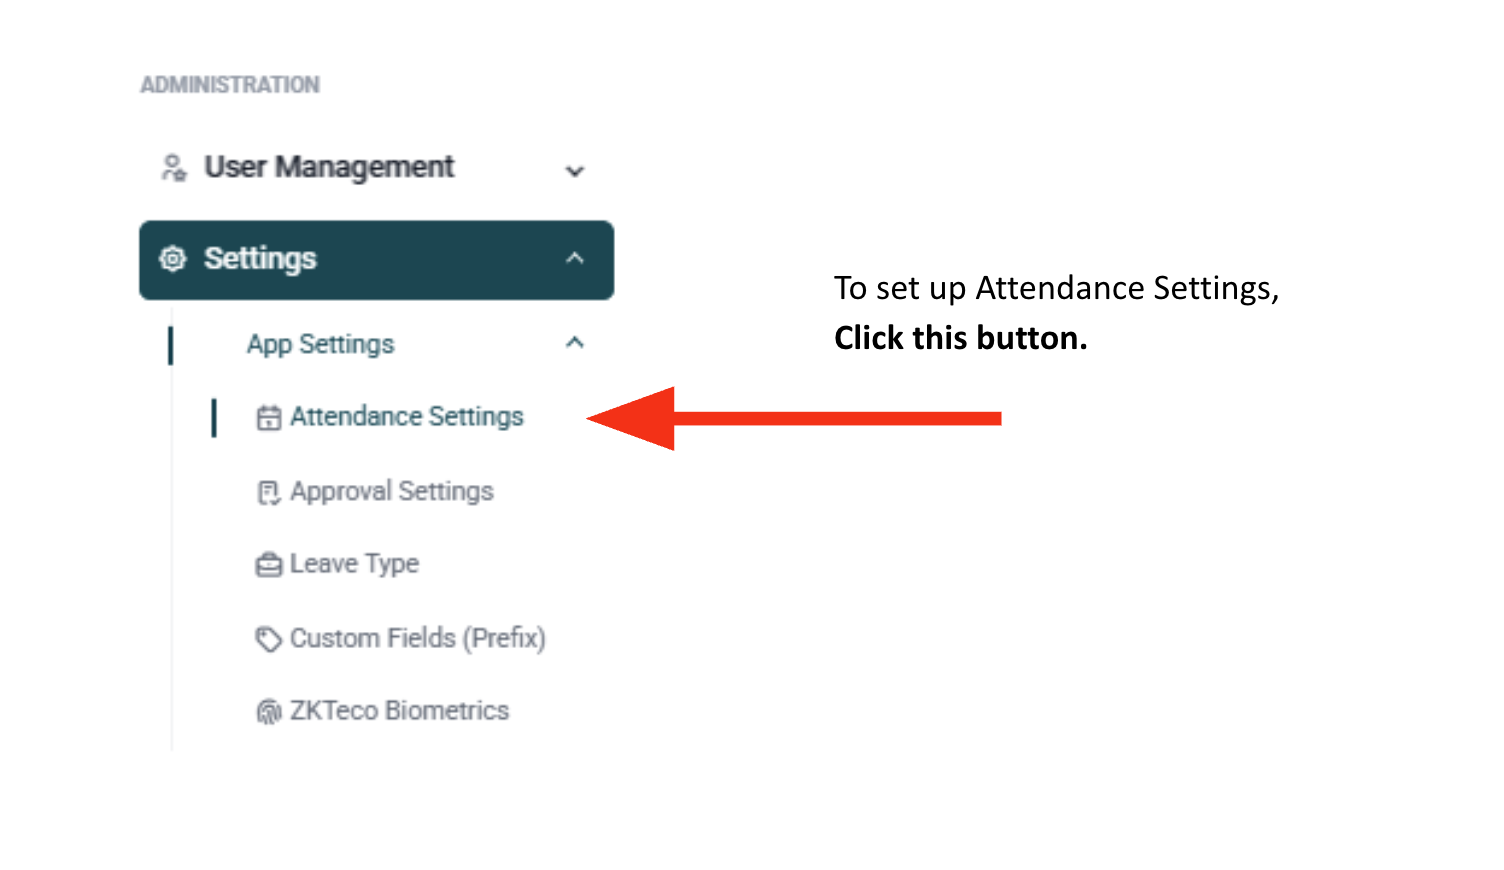
Enable advanced features for attendance tracking:
- Geotagging - captures employee location when clocking in/out (requires device location enabled).
- Geofencing - restricts clock-in/out to a specific location within a set radius.
- Photo Capture - requires employees to take a photo when clocking in/out.
- Late Status Box - requires employees to provide a reason when clocking in late.

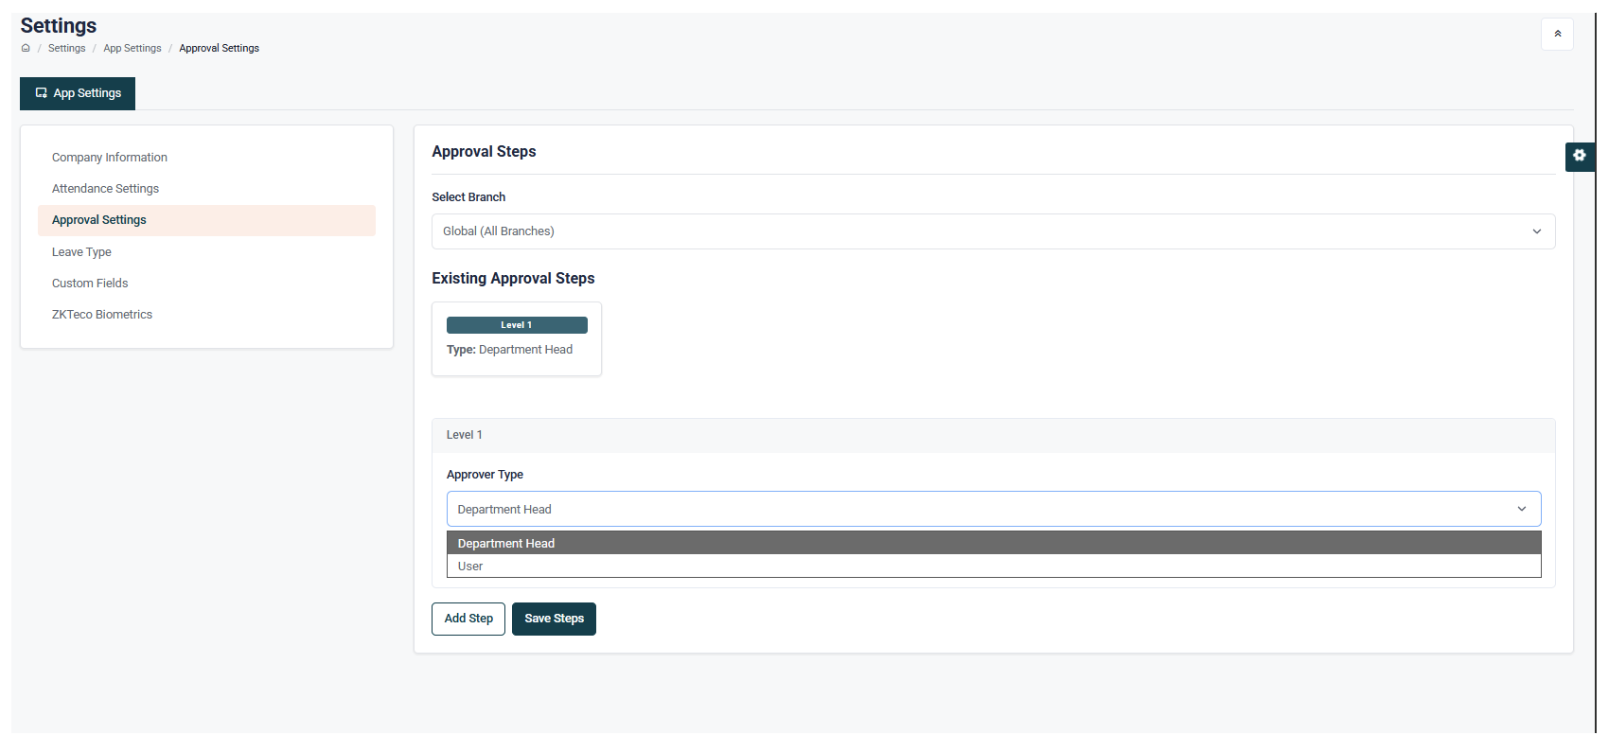
Approval Settings
- By default, the department head is the primary approver.
- If additional approval levels are required, you can configure multiple steps and assign subsequent approvers.
How to setup roles & permissions?
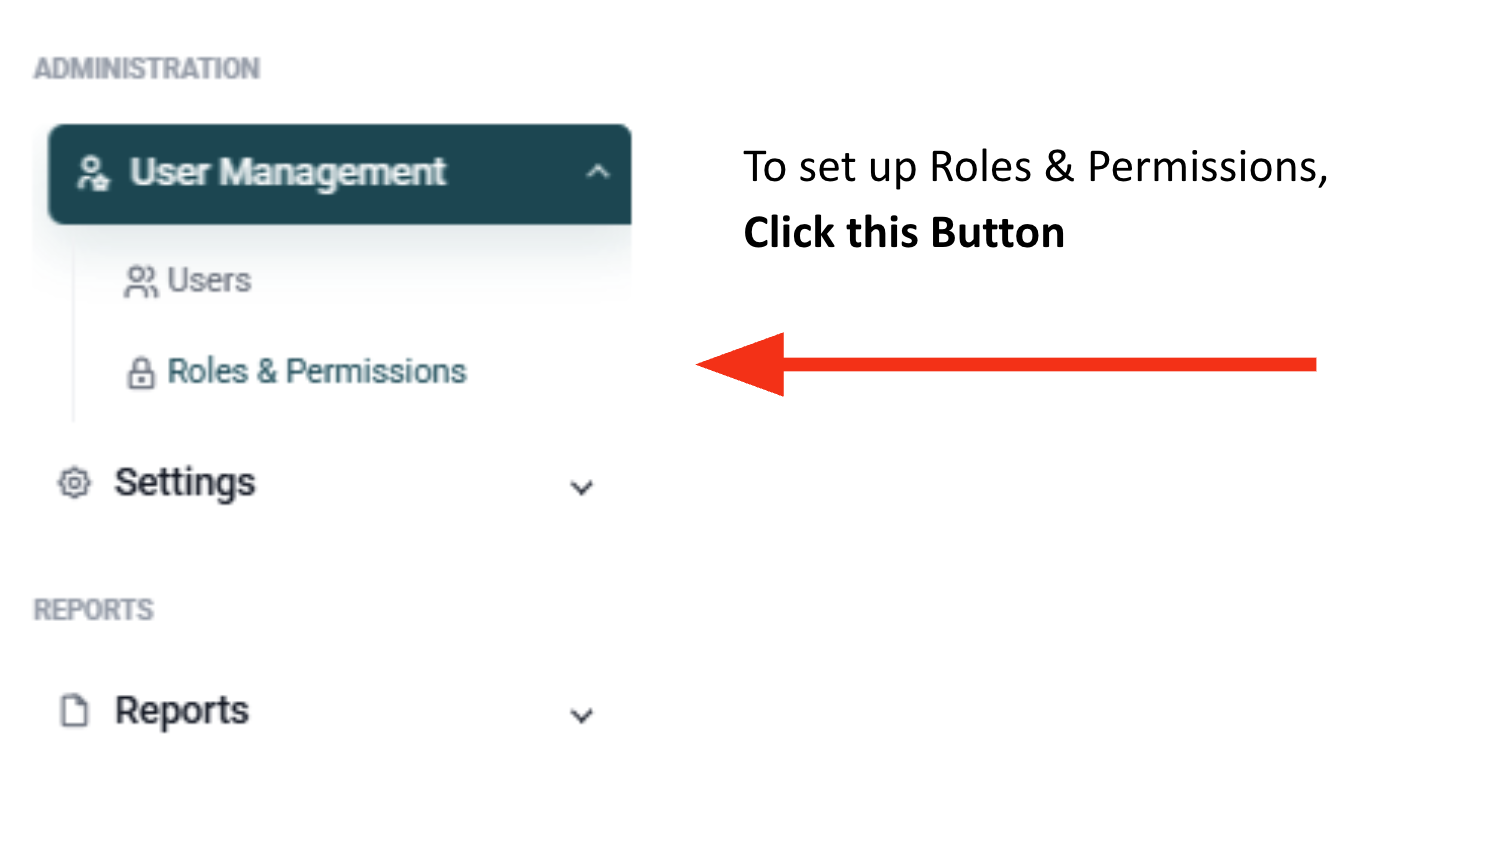
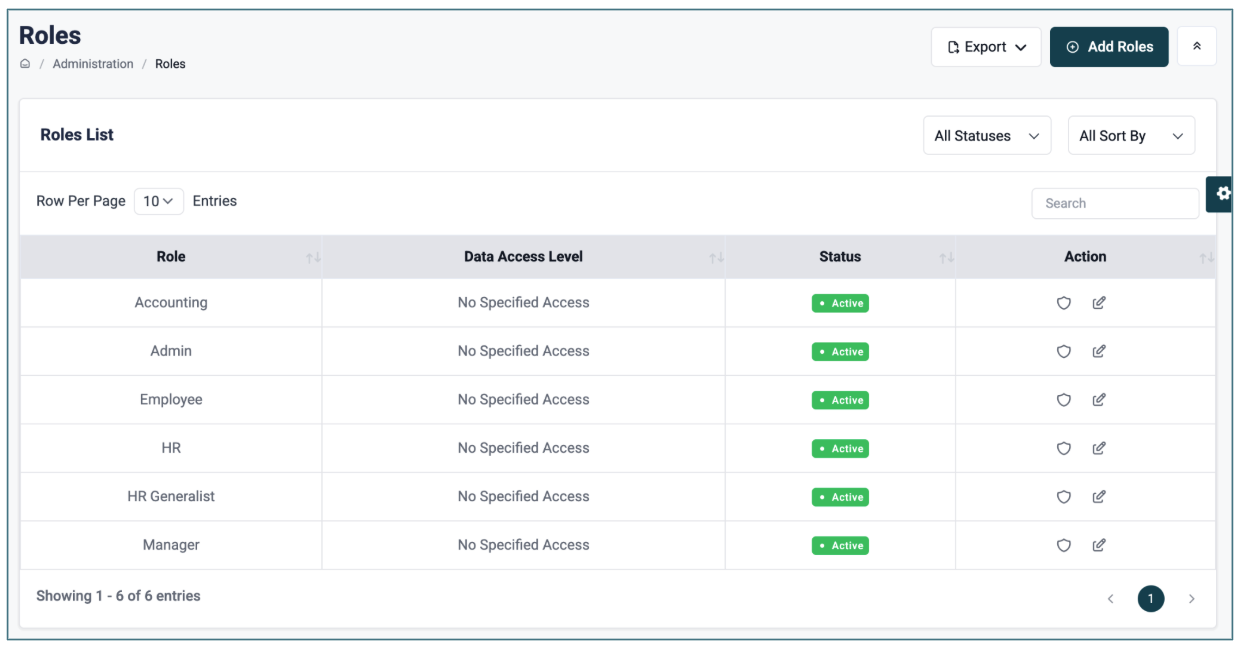
Timora provides default roles with flexible permissions: Admin, Accounting, HR, HR Generalist, Manager, and Employee.
-
Roles and permissions can be customised per feature and data access level:
- Organization-wide - access to all branches
- Branch level - access to a specific branch
- Department level - access to specific departments
- Personal - access to one’s own data only
- You can override permissions for individual employees to enable or restrict additional features.
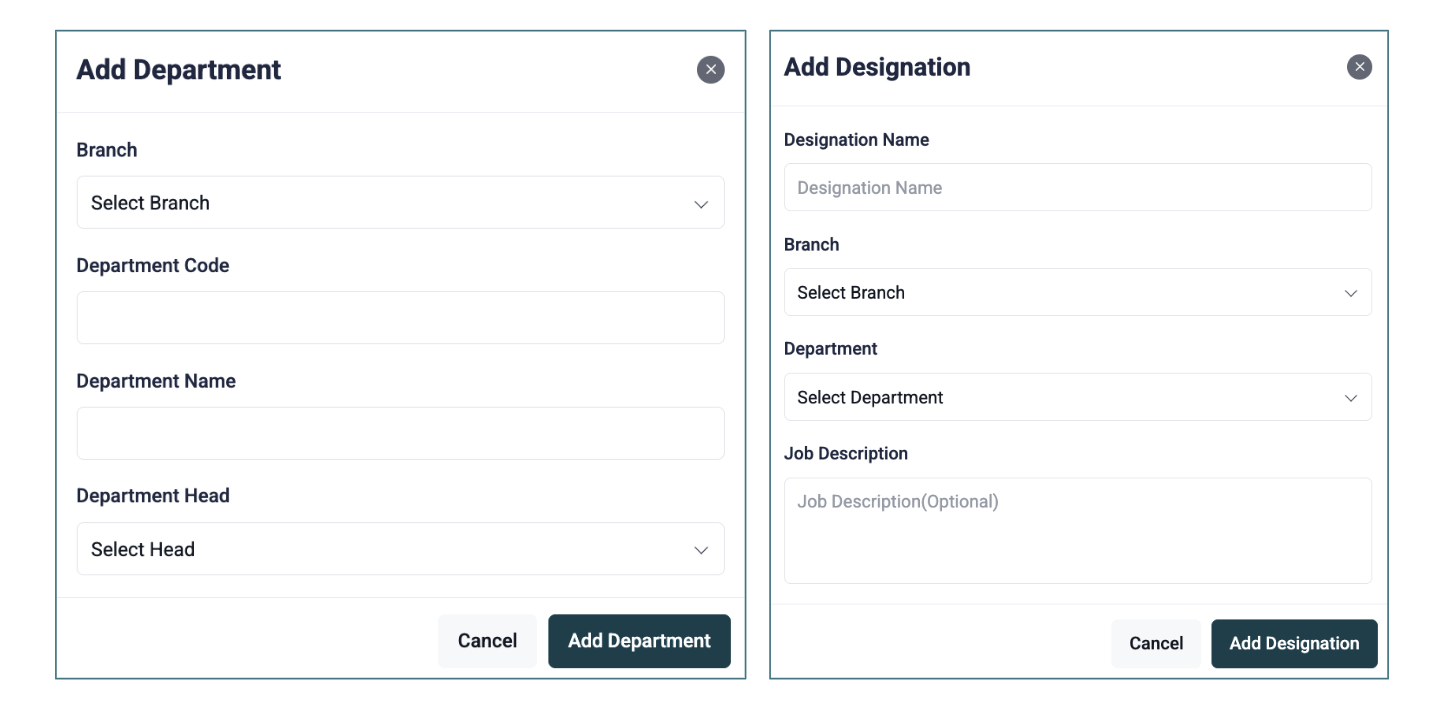
How to setup departments & designations?
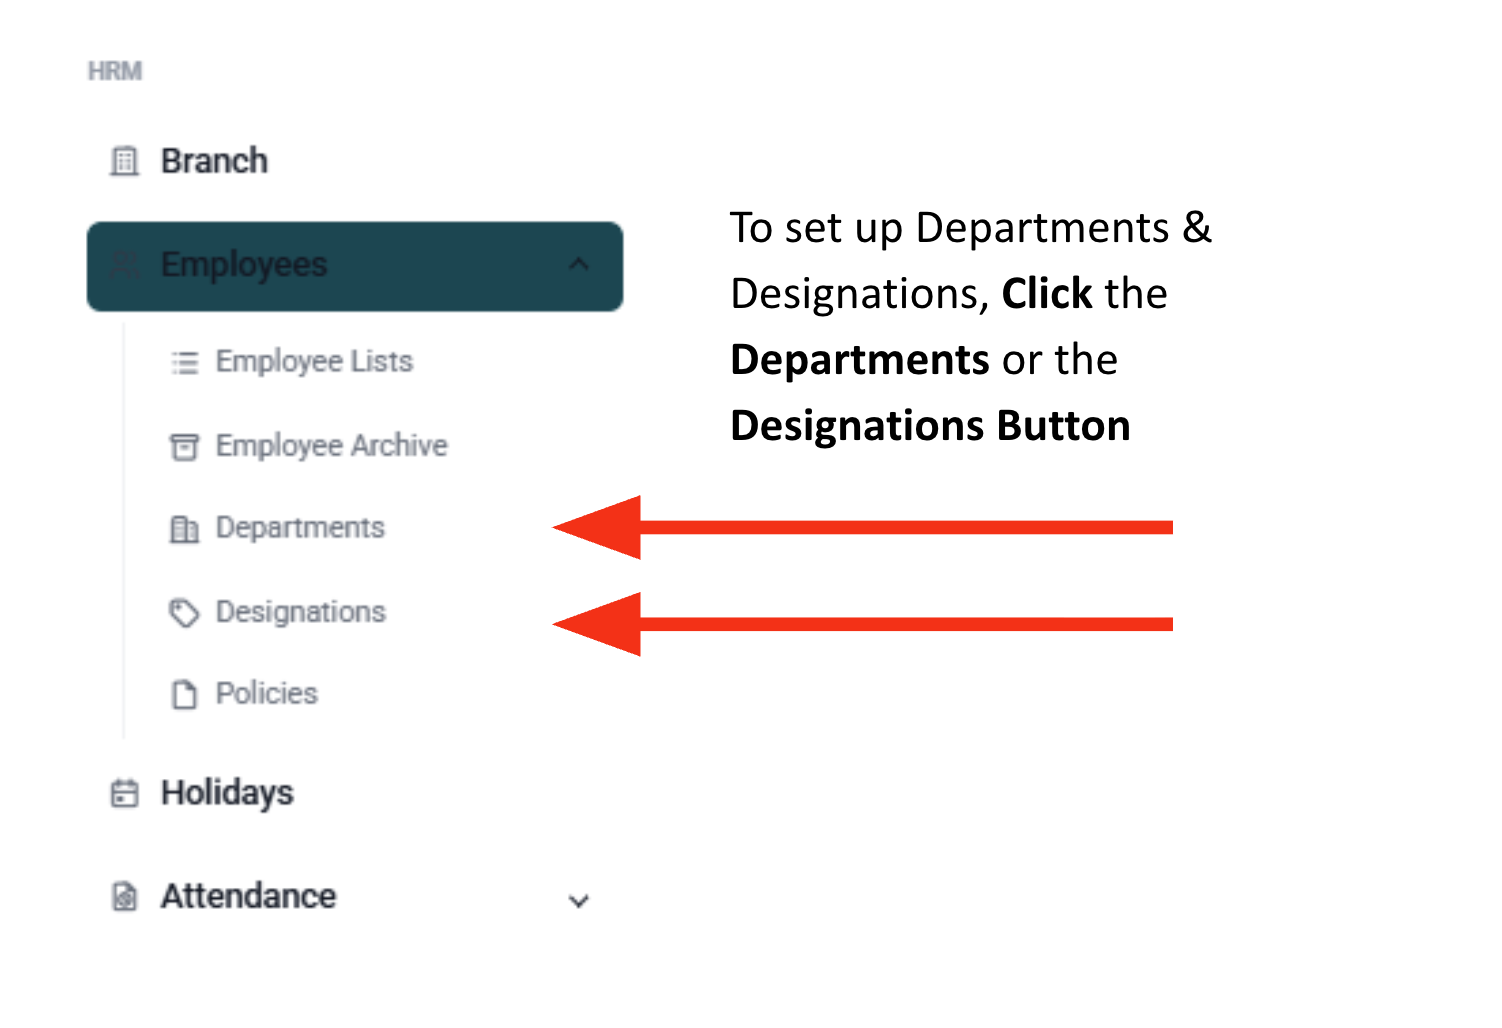
List down your company’s departments and designations before adding employee accounts.
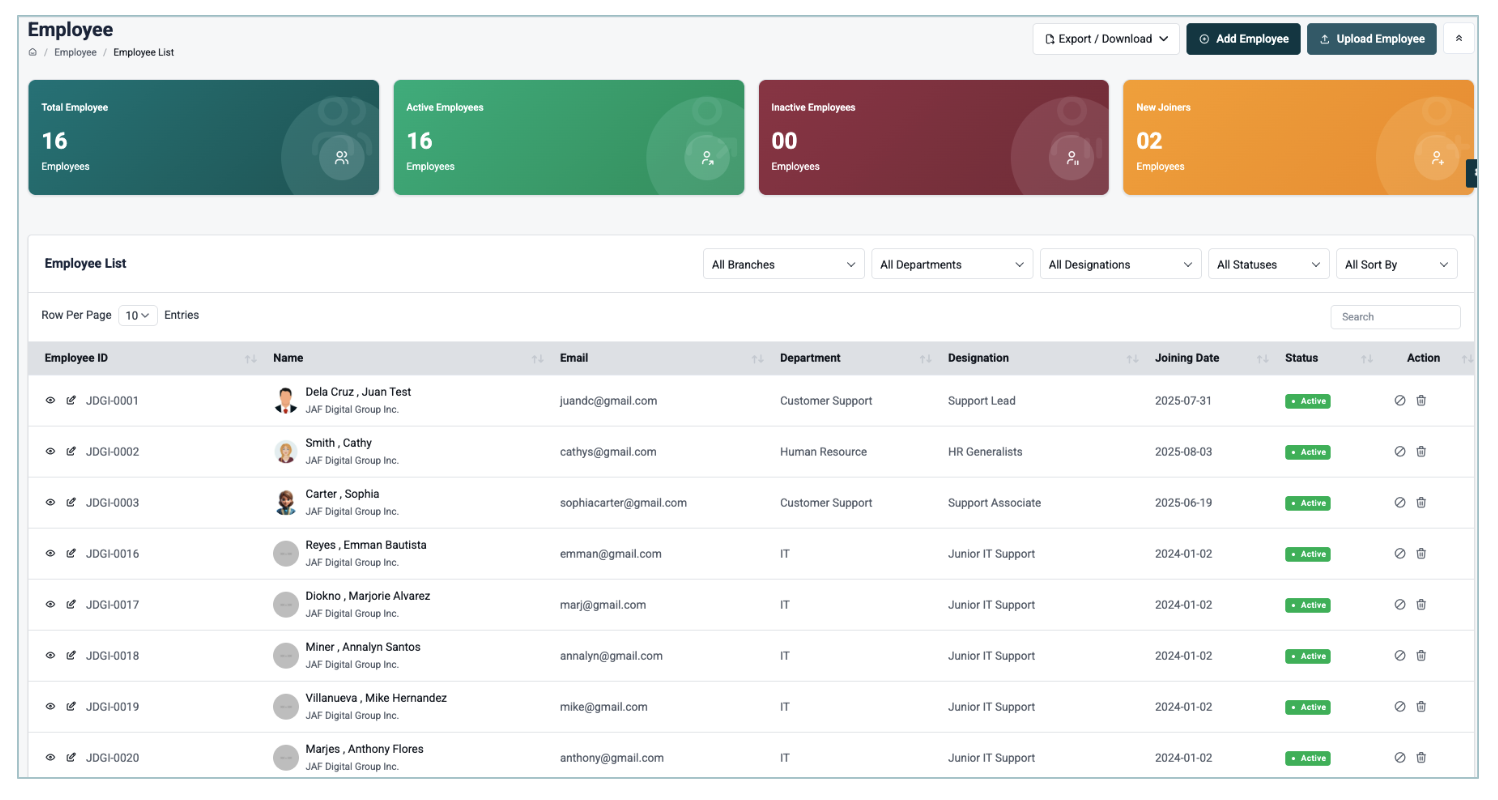
How to setup employee accounts?
Two options to add employees:
1. Bulk Upload - Download the template, fill out required fields, and import.
2. Manual Entry - Add employees individually.
Required fields: First Name, Last Name, Employee ID, Joining Date, Email, Username, Password, Role, Branch, Department, Designation, Employment Status.
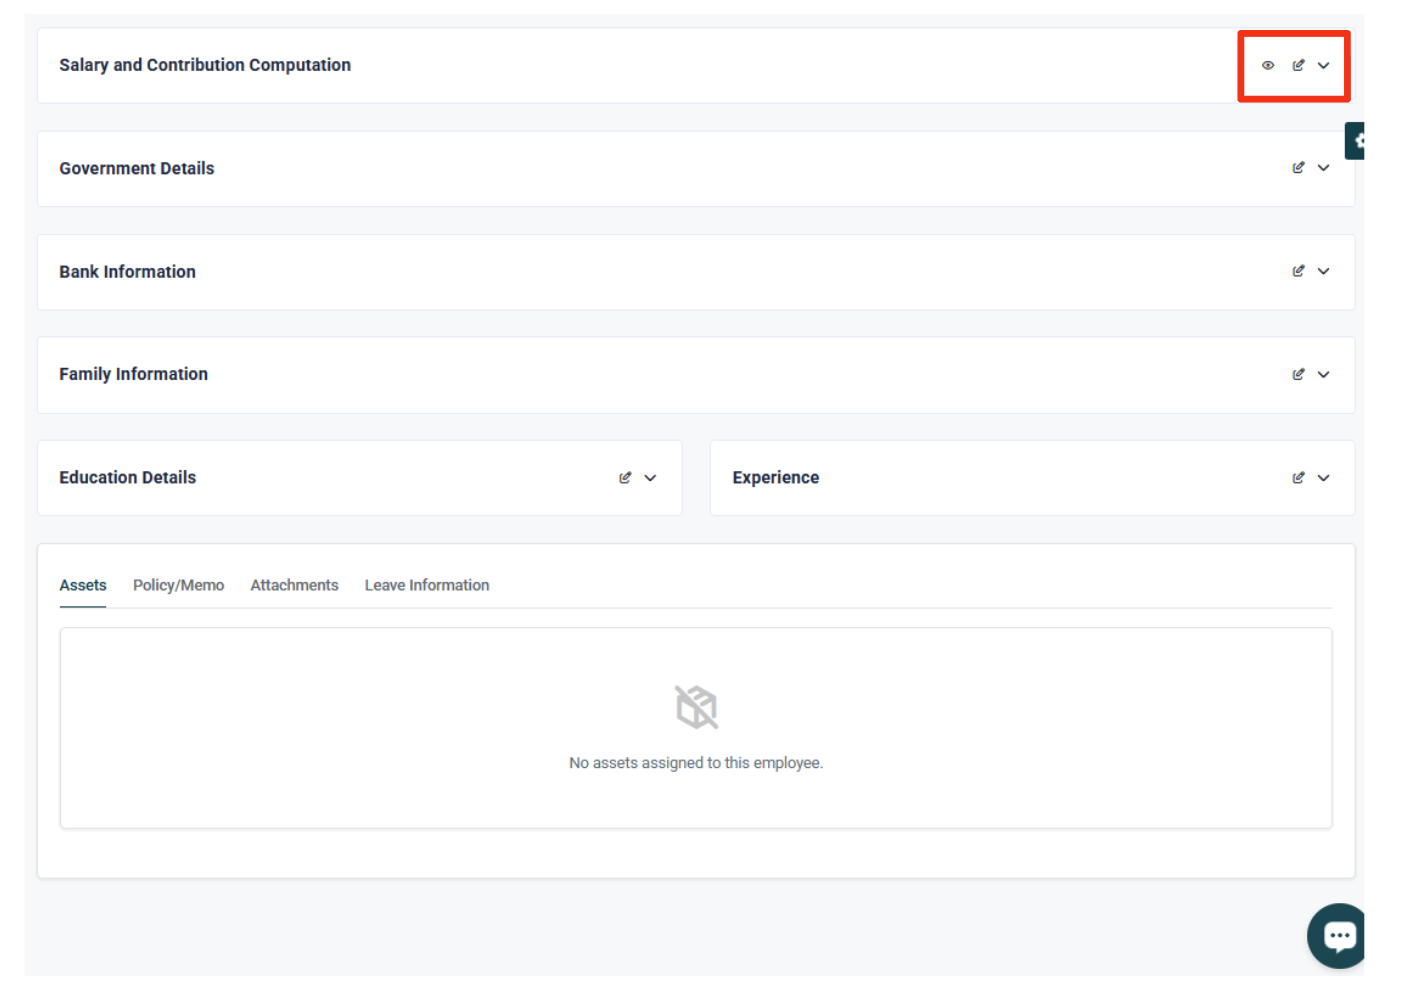
To navigate to the 201 Form, Click the Eye Icon/View Button.
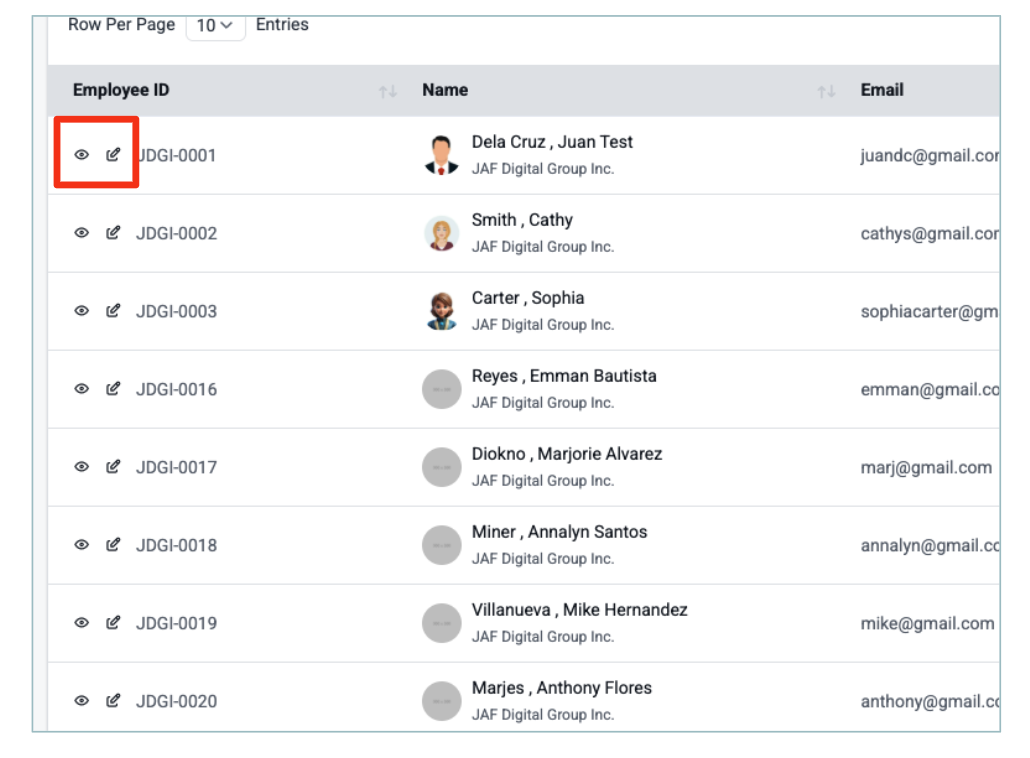
Update and maintain employee records, including:
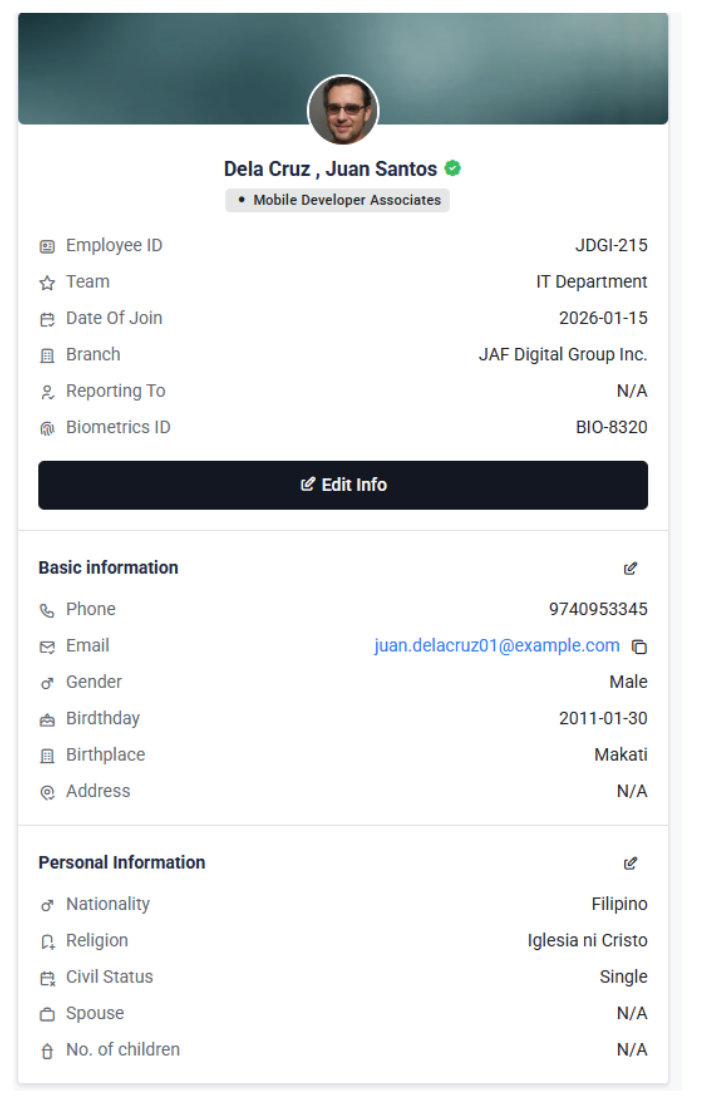
- Basic & Personal Information
- Emergency Contact Details
- Salary & Contribution Computation
- Government Details
- Bank Information (optional)
- Family & Education Background
- Work Experience
- Attachments (PSA, NBI, Medical, etc.)
Note: When updating salary details, always set an effective date. The system will automatically deactivate the old salary record and apply the new rate for accurate payroll calculations.
To navigate to the Salary Record, Click the Eye Icon/View Button.
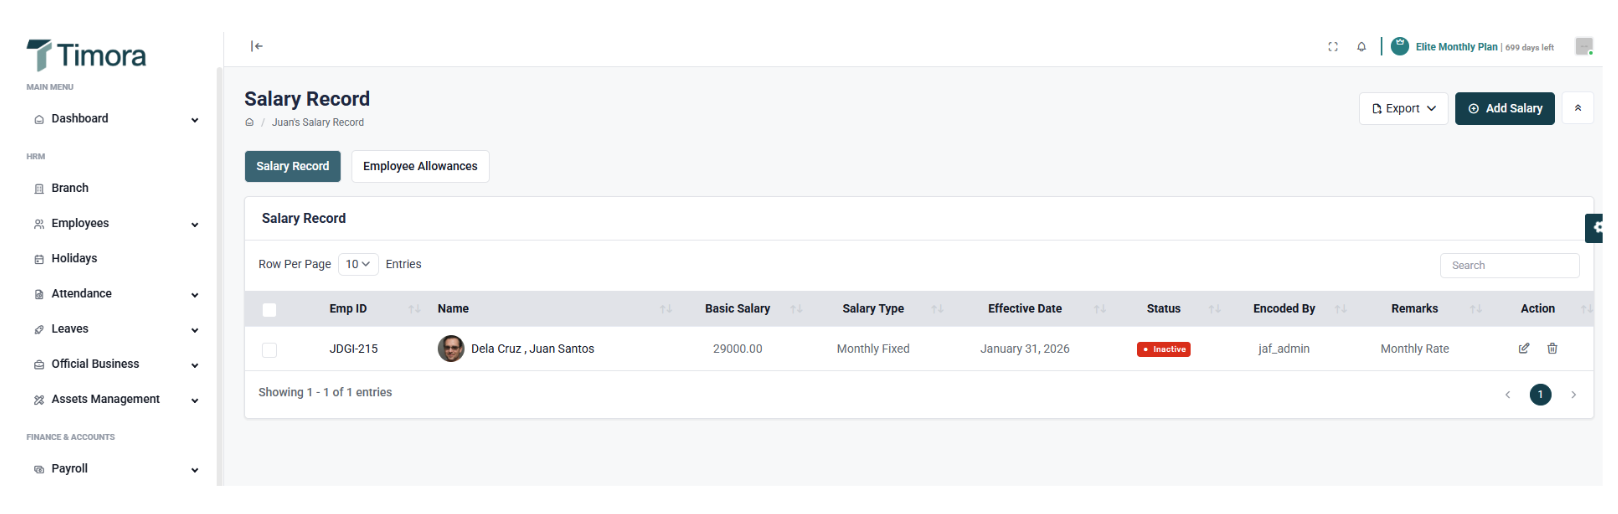
You can track each employee’s salary details in this section. The system automatically follows the active and most recent effective date when computing salaries. Once a new salary rate is added, the previous record becomes inactive, ensuring accurate and up-to-date payroll computation.
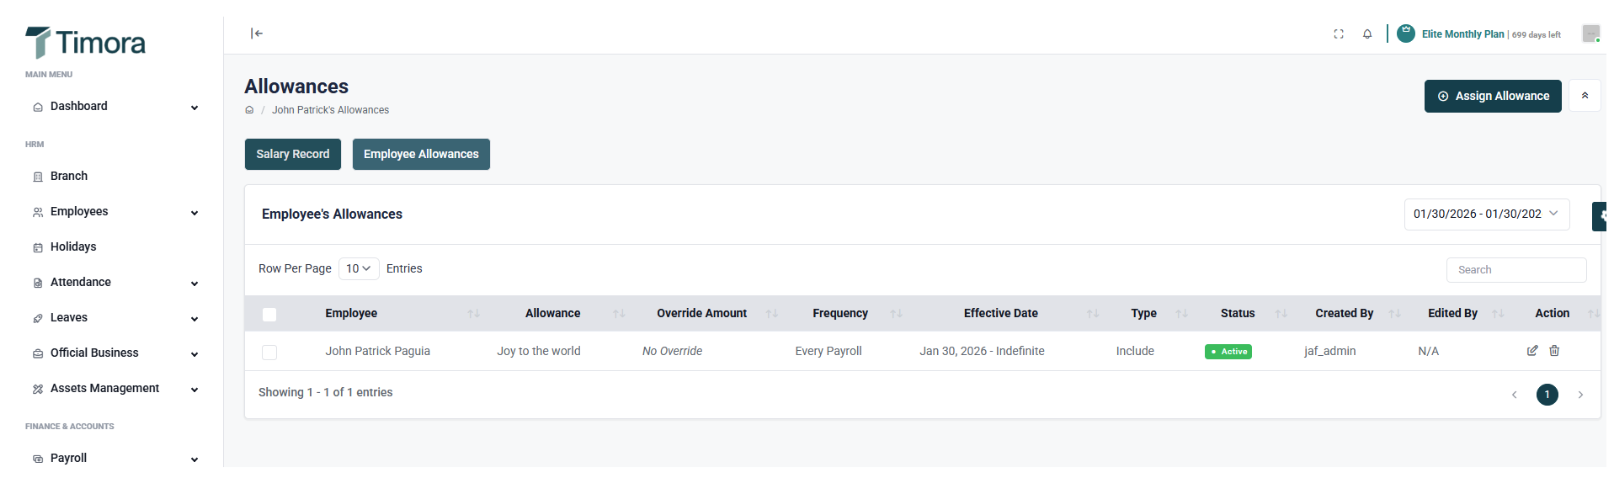
In the Allowance Record section, you can assign specific allowances to employees based on the defined Payroll Items. You may override the amount and calculation basis directly within this section—whether it’s Fixed, Per Attended Day, or Per Attended Hour - for flexible and precise allowance management.
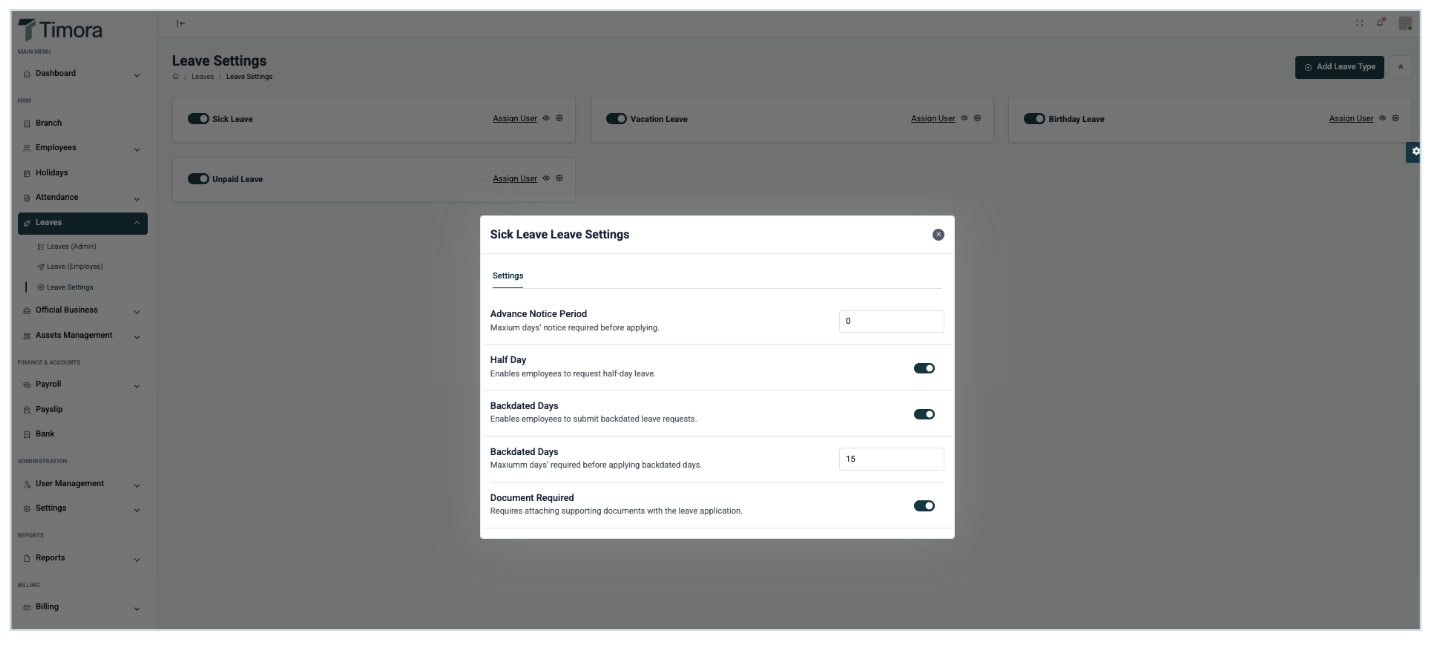
How to setup leave settings?
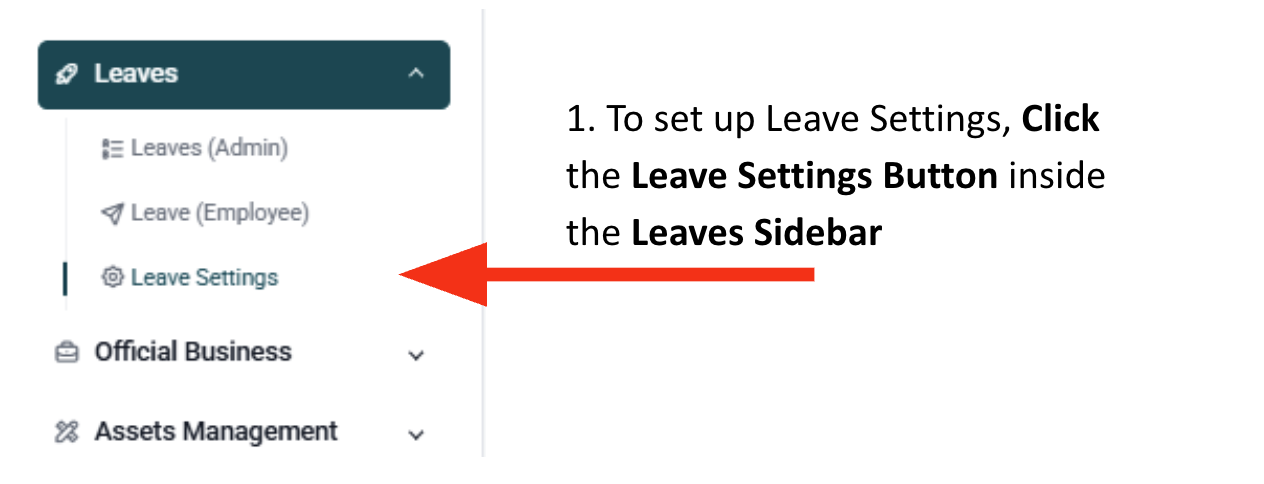

Leave Policy
- Advance Notice Period - Sets the maximum number of days’ notice required before an employee can apply for leave.
- Half Day - Allows employees to file half-day leave requests.
- Backdated Days - Allows employees to submit backdated leave requests within the defined limit.
- Document Required - Requires employees to attach supporting documents when filing a leave request.
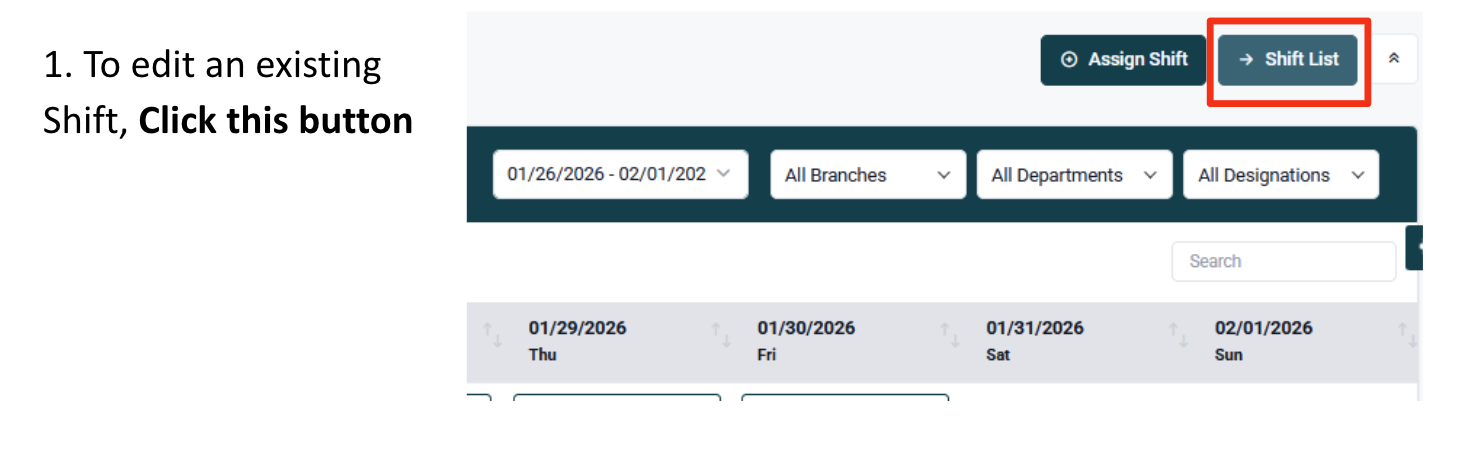
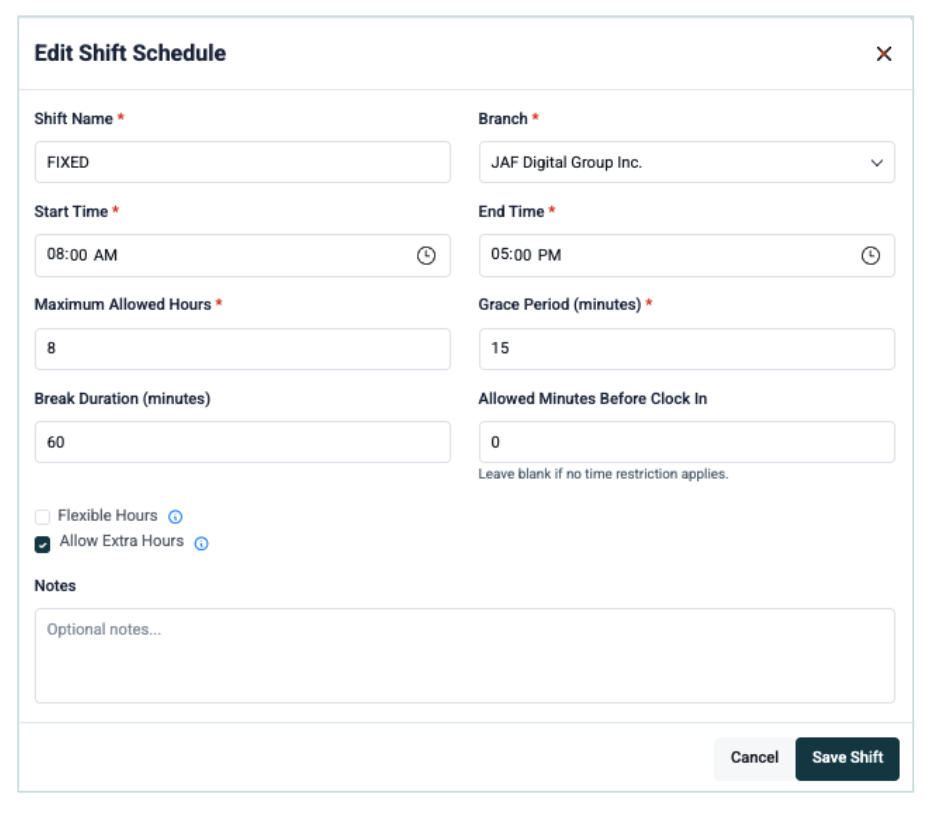
How to setup shift management?
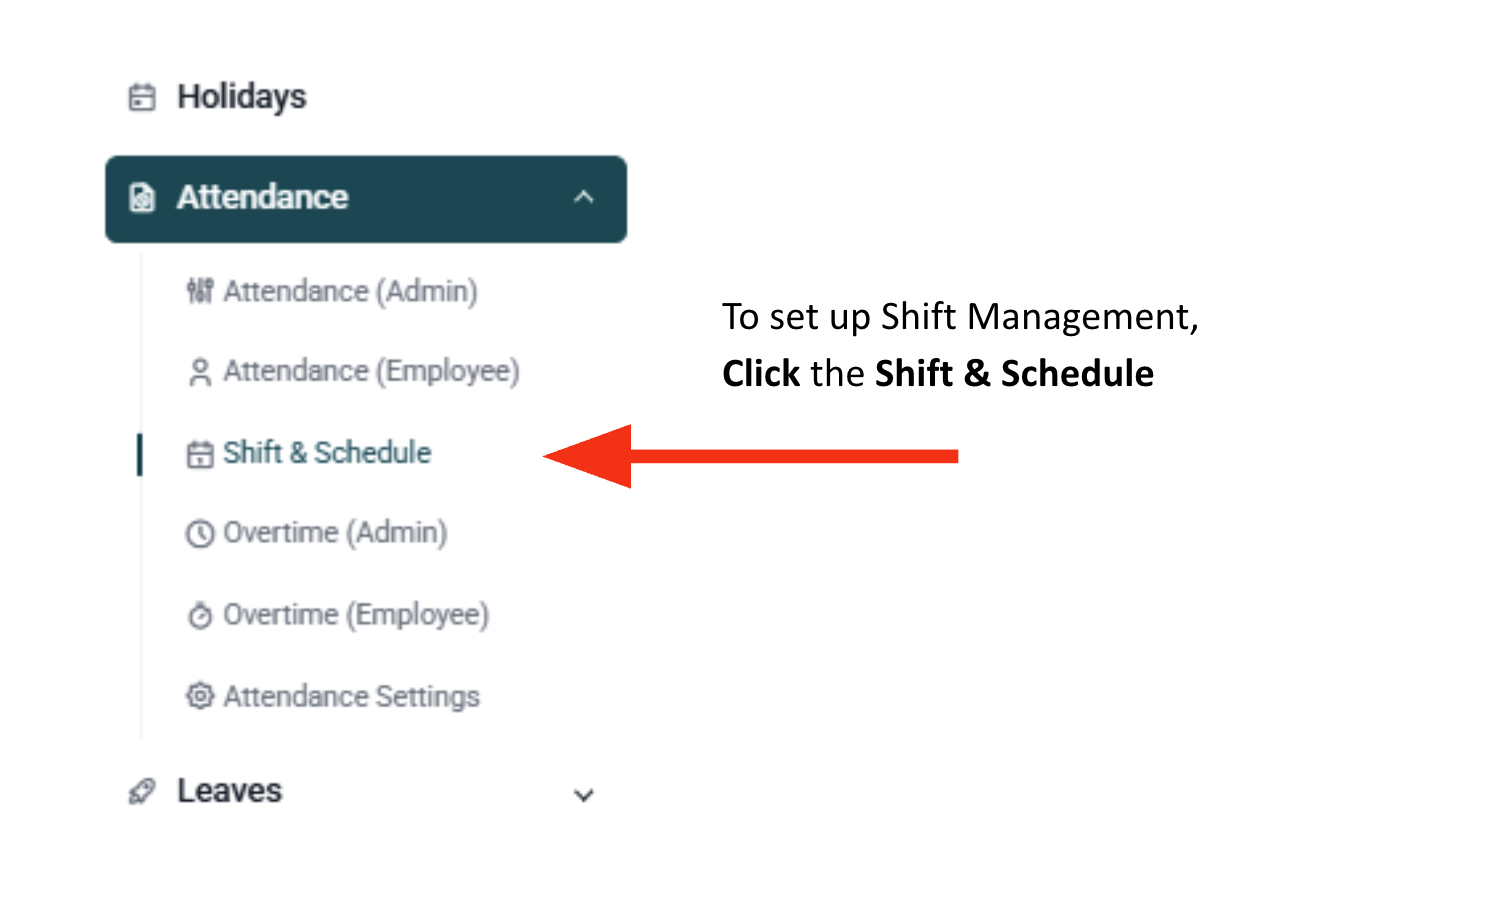
Define work schedules for employees:
- Flexible, normal, graveyard, or custom shifts
- Set maximum allowed hours per day (to avoid excess time counted as regular hours)
- Assign shifts using:
- Recurring dates - regular weekly schedules
- Custom dates - start and end dates, ideal for rotating schedules
- Configure rest days: enable “Allow Clock-in on Rest Day” for employees required to work during off-days.
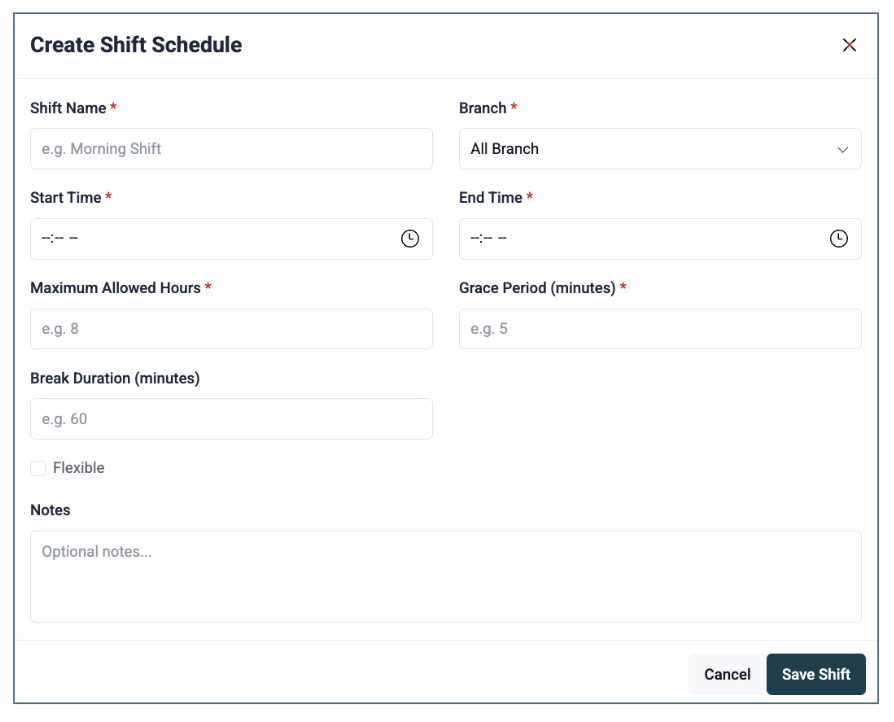
To activate the Break Hour feature:
1. Go to Shift & Schedule and open your Shift List.
2. Set the Break Duration to 60 minutes (or your preferred duration).
3. Once saved, the Break Hour button will automatically appear on the employee’s Attendance Dashboard, allowing them to log their break time during work hours.


Allow Extra Hours - Automatically records excess working hours as overtime and files them as pending for approval.
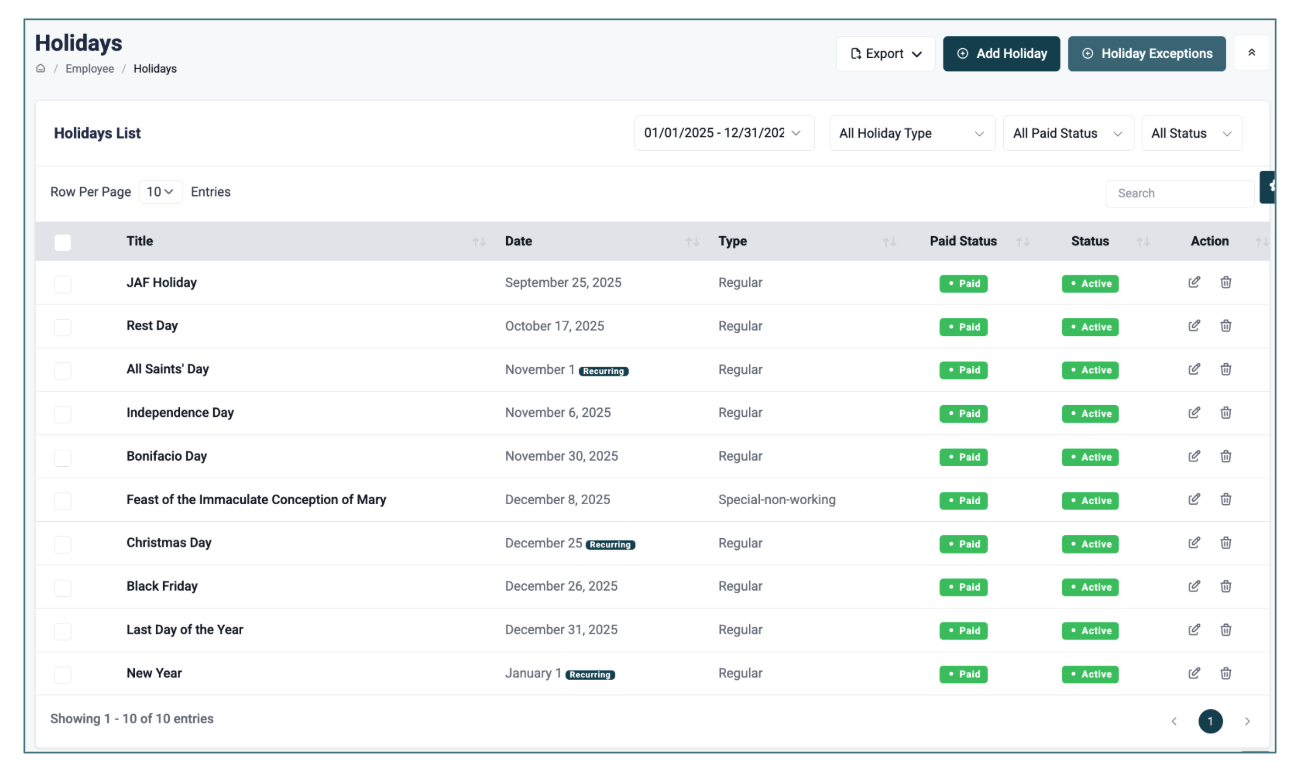
How to setup holidays?

Timora comes with default holidays based on the government gazette. You can also add and customize holidays specific to your company or location.
- Policies follow DOLE guidelines.
- Holiday Exception: You may exclude specific employees from holiday pay by adding them to the holiday exception list.
Inside the official business for employee

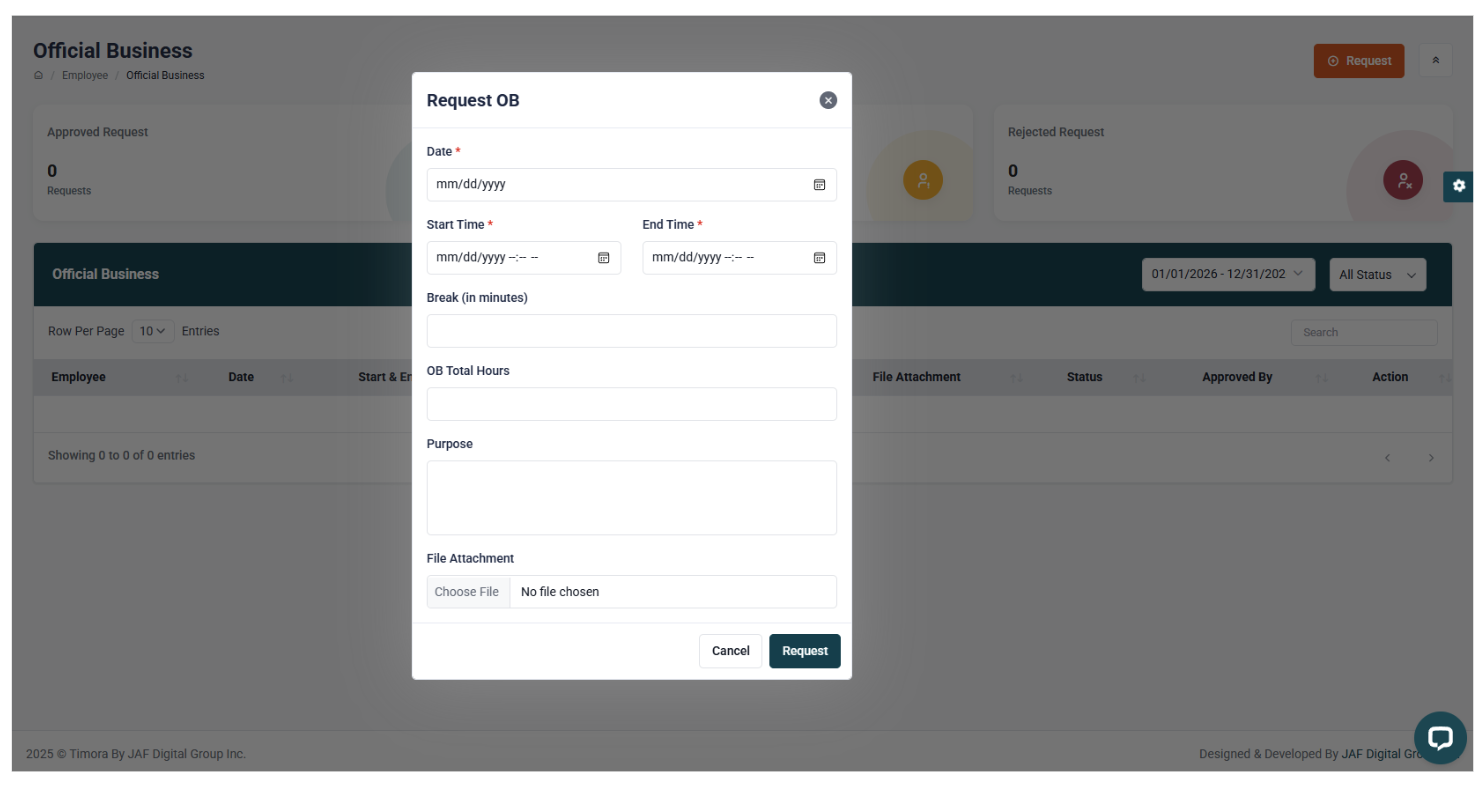
Inside the official business for admin

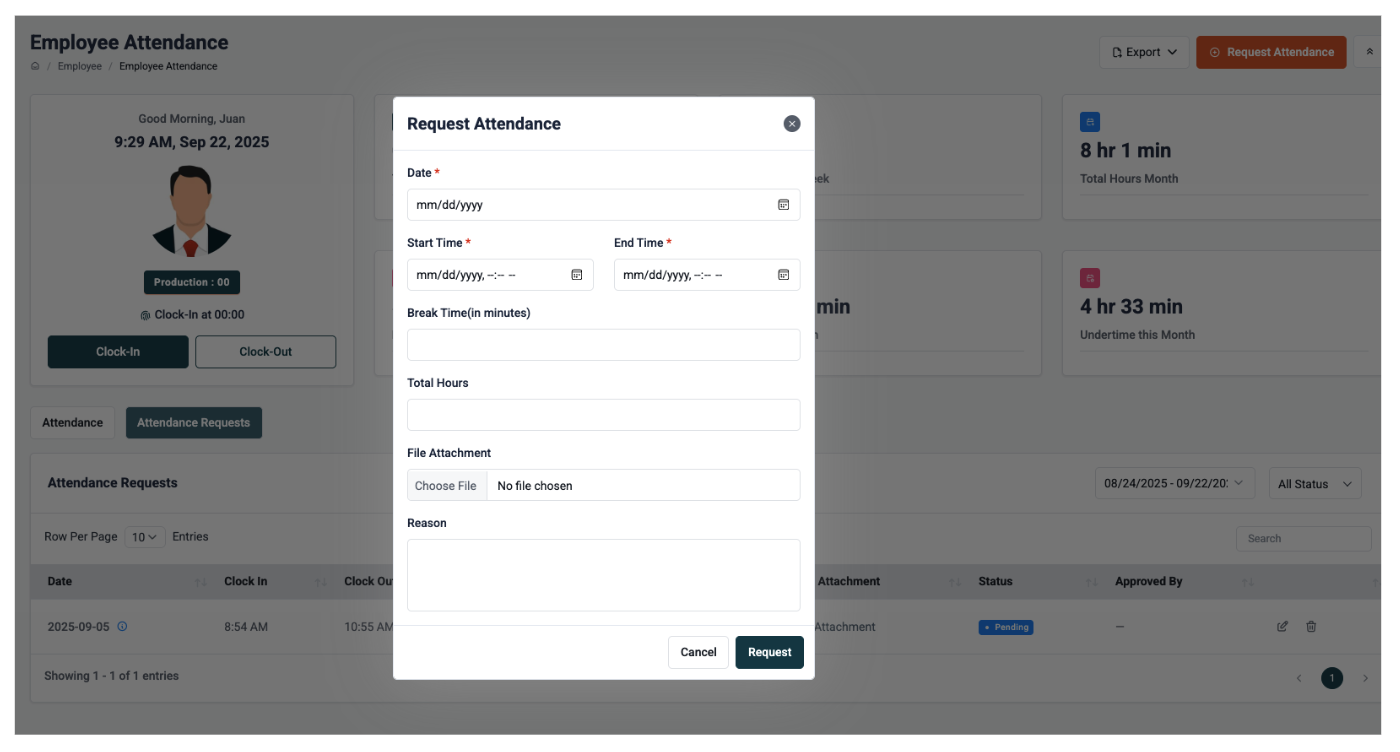
How to request attendance?

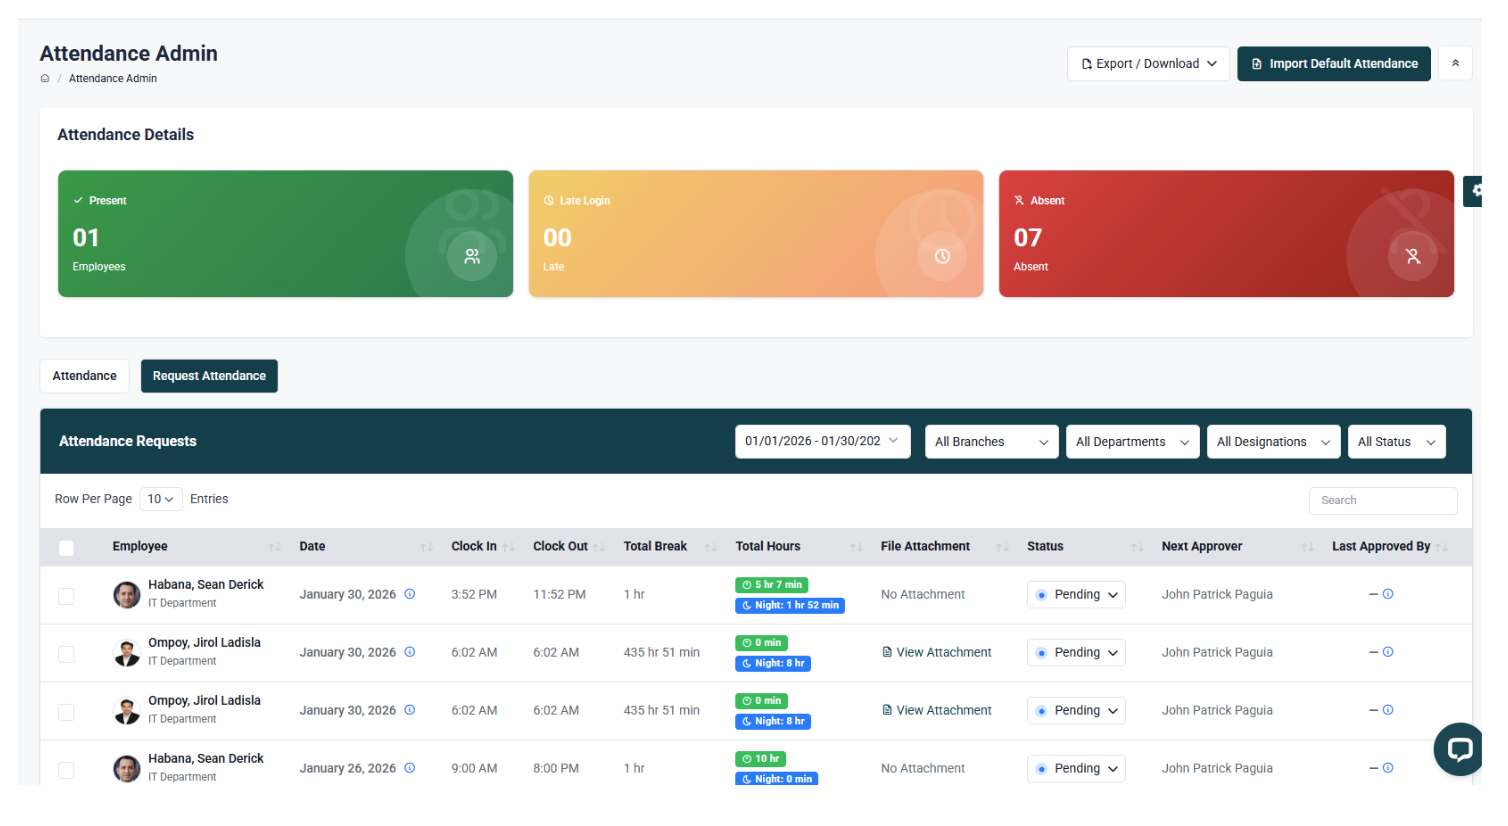
How to see the list of attendance request?

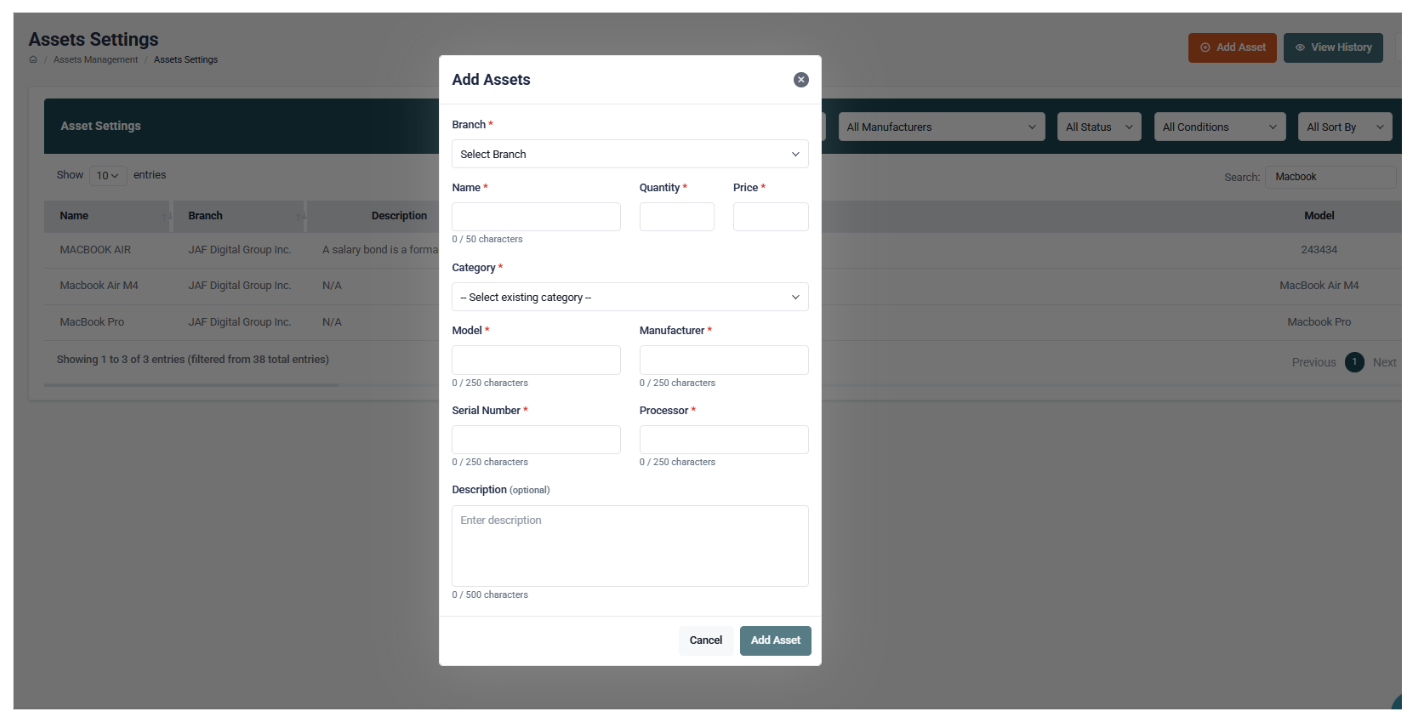
How to setup assets?

- Go to Employee Asset.
- Filter by branch.
- Select the employee(s) and assign one or multiple assets.
Note: The system supports assigning multiple assets per employee.
How to control anything Payroll related?

Before running payroll, ensure that:
- All employee salary details are updated.
- Contribution types are configured.
- Custom earnings, deductions, and allowances (if any) are set.
- All employee requests (e.g., leave or overtime) are approved.
Note: Payroll processing accuracy depends on the completeness of employee data and approval of requests.
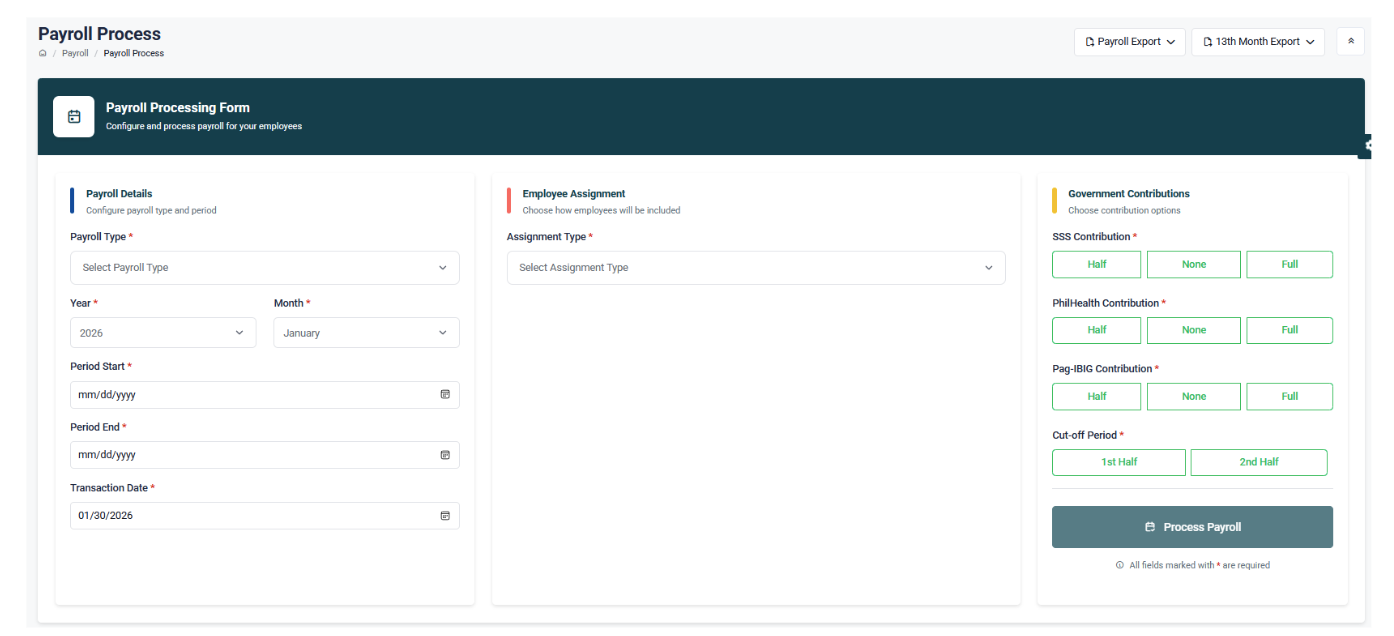
Payroll processing has three steps:
1. Filter - Select payroll type (Normal, 13th Month, or Final Pay), cut-off period (1st half, 2nd half, or weekly), transaction date, and assignment type (Manual or Batch).
a. Contribution Deduction Options:
- i. Half: Deduct half contribution
- ii. None: Exclude contribution
- iii. Full: Deduct full month contribution
2. Process - Click the Process button to calculate payroll. Employees selected will be listed with calculated details. Adjustments can be made before finalizing.
3. Generate - Select employees, apply bulk actions, and generate payslips. Payslips are instantly available for employees in their portal.
Additional Features:
- Bank Report Export - For salary disbursement.
- Revert Payslip - Reprocess payroll if adjustments are required.
- Employee Payslip Access - Employees can view only their own payslips.

How to process payroll?
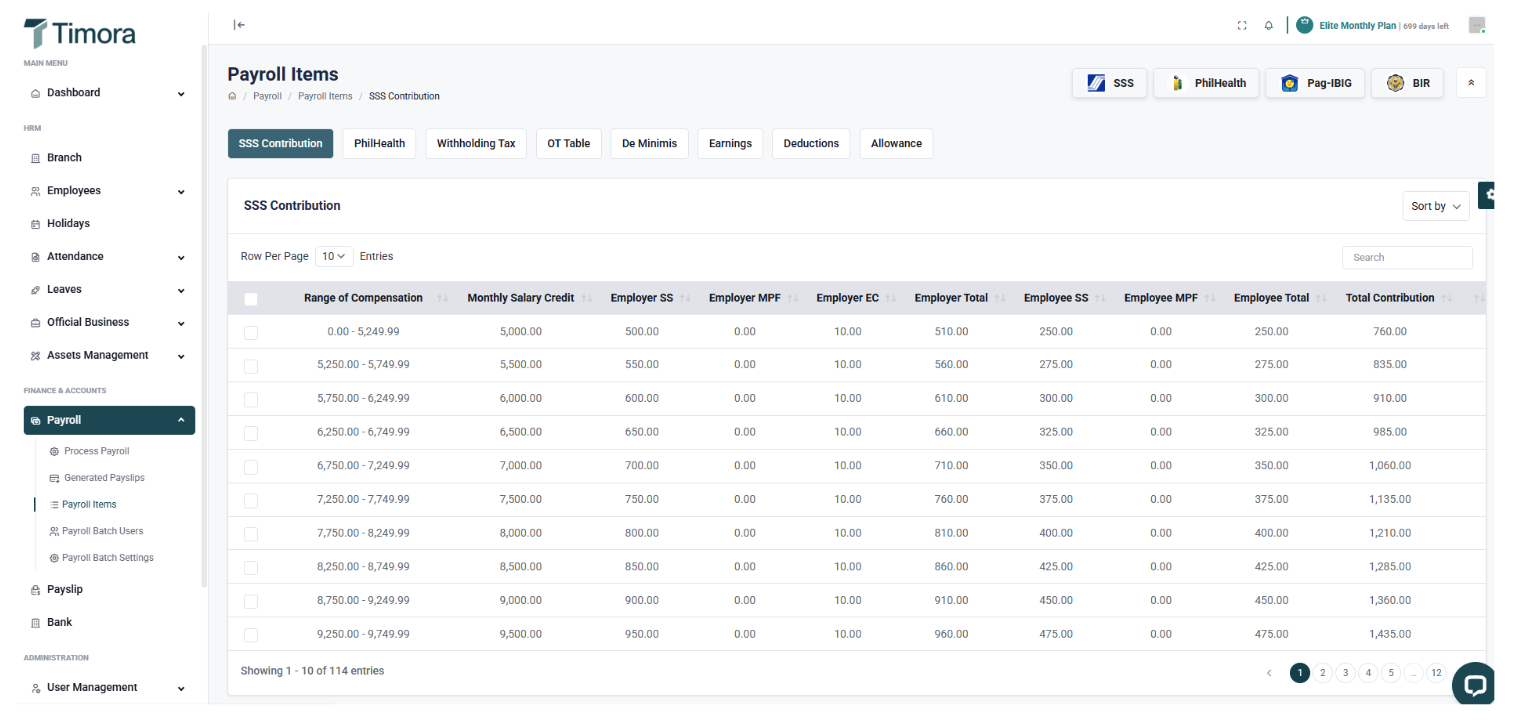
1. Payroll Items
If System Computation is selected for contributions, the system will automatically follow DOLE’s latest tables.
- Contributions: SSS, PhilHealth, Withholding Tax, OT, De Minimis
- Additional sections: Earnings, Deductions, Allowances
- Quick links to official contribution tables are provided.
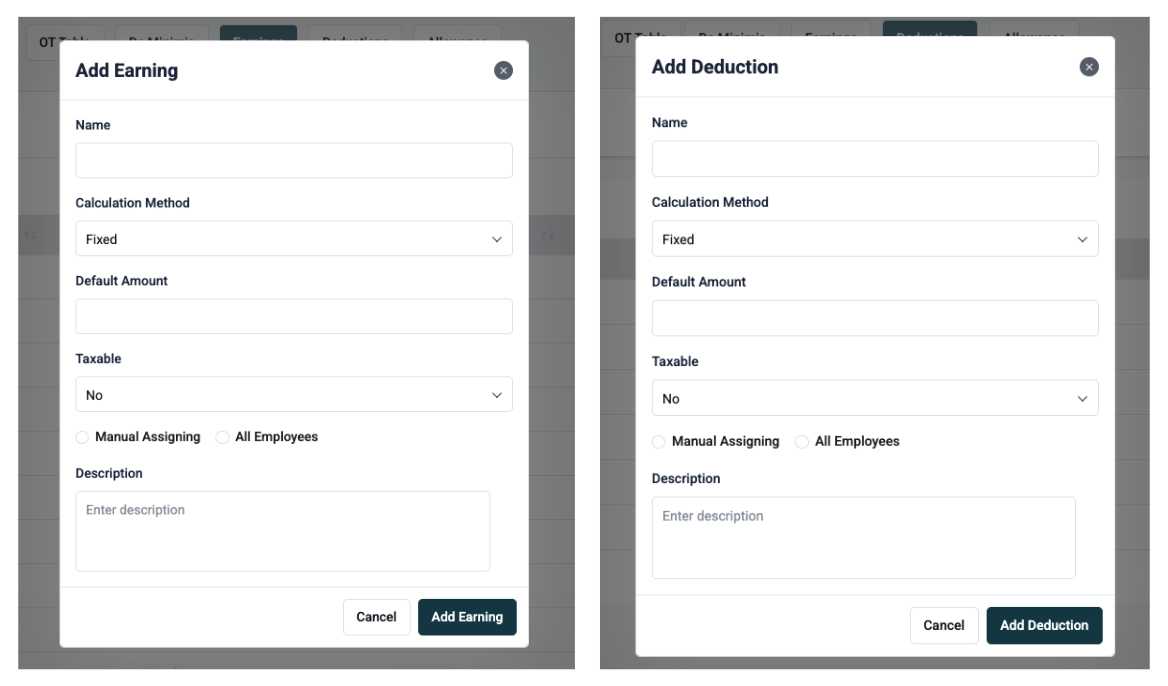
2. Earnings & Deductions
- Define the type of earning/deduction to add.
- Required fields: Name, Calculation Method (Fixed or Percentage), Taxable/Non-taxable, Assigning Type (Manual or All employees), and optional Description.
Difference:
- Fixed: Enter the total amount.
- Percentage: Define the percentage of the employee’s earnings to apply.
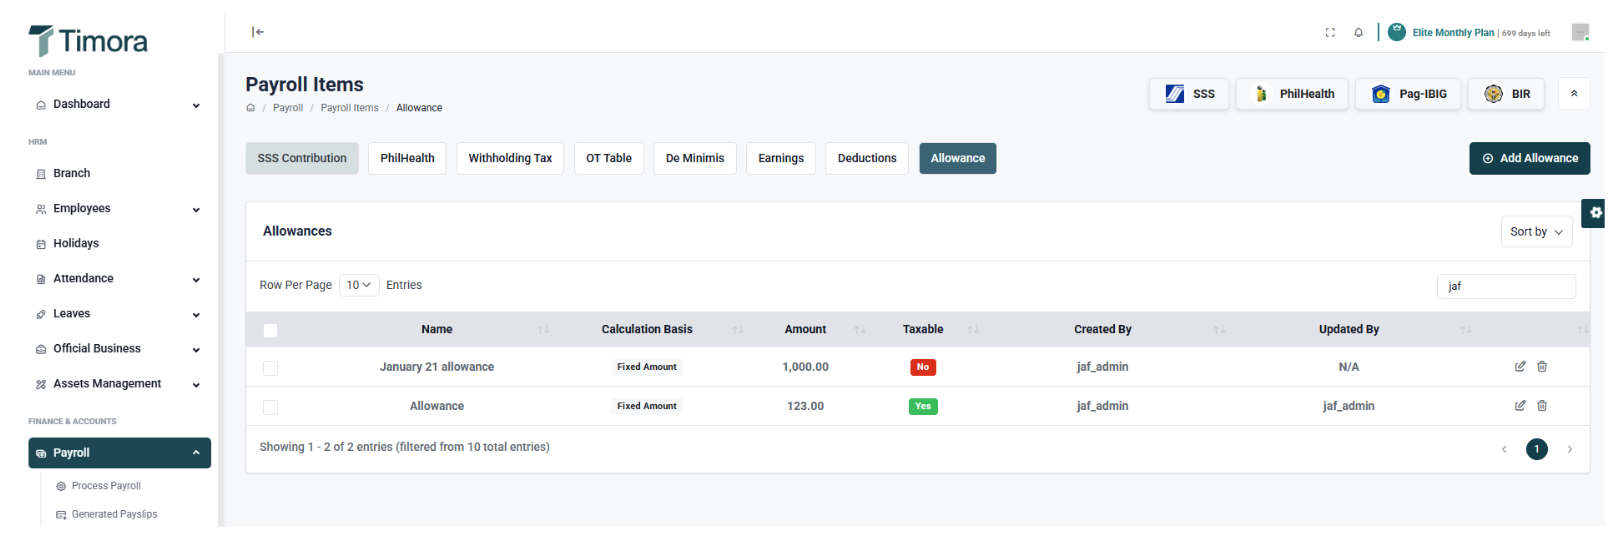
3. Allowances
For automated allowances that accumulate daily or hourly:
- Input Allowance Name.
- Select Calculation Basis (Fixed, Per Attended Day, Per Attended Hour).
- Define Taxable/Non-taxable
- Choose Assignment Type (Manual or All employees).
Difference:
- Fixed: Total amount of allowance.
- Per Attended Day: Amount accumulates per day worked.
- Per Attended Hour: Amount accumulates per hour worked.
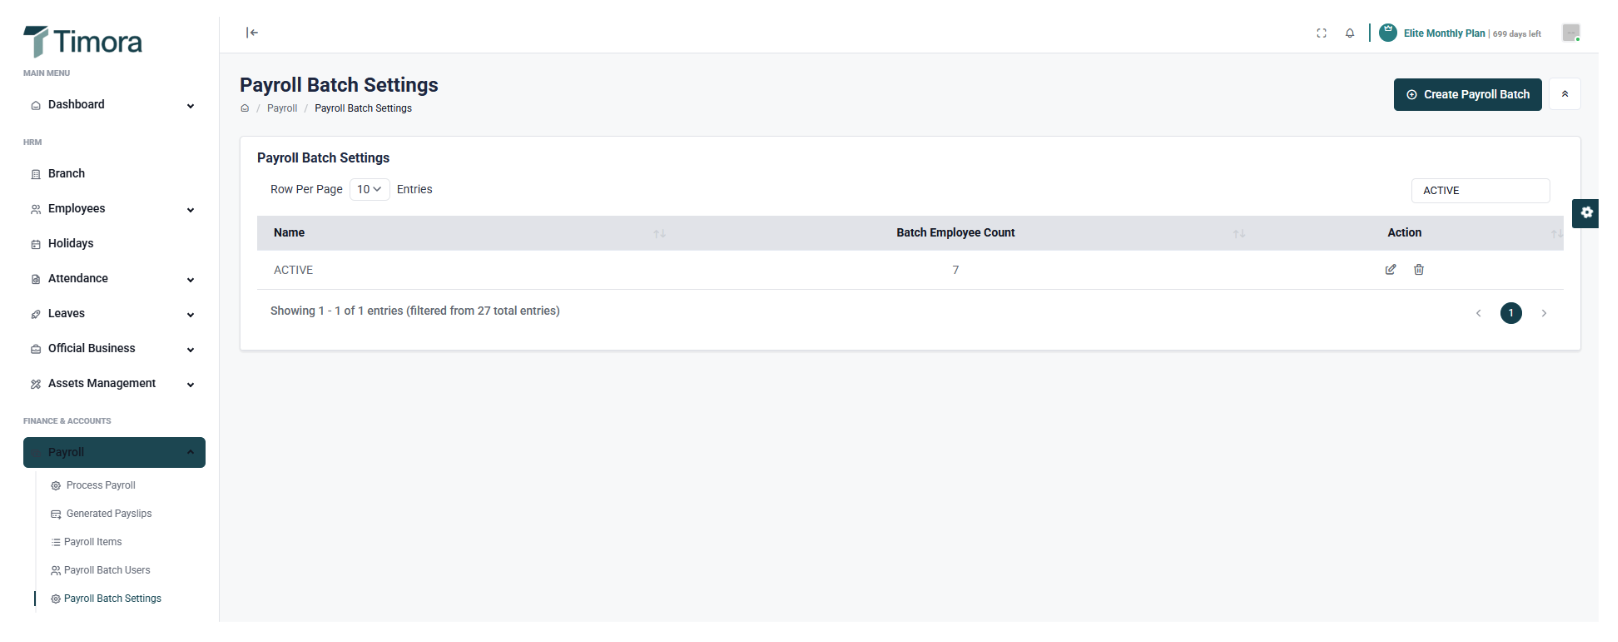
How to group employees into batches?
- Group employees into batches (e.g., Batch 1, Batch 2) for easier payroll processing.
- Assign each employee to a batch or group.
How to export bank file?
- Generate salary disbursement files in CSV or DAT format.
- After payroll processing, export the bank report and upload it to your bank for disbursement.

How to export payroll reports?
- View and export payroll summaries by date range and DAT branch.
- Export format: CSV

Alphalist Reports
- Ensure all employees have valid TIN numbers.
- Filter by branch and year.
- Generate and export Alphalist via CSV.

SSS Reports
- Generate both employee and employer share reports.
- Export format: CSV
Bills & Payment
In the Billing and Subscription section, you can conveniently settle payments and download invoices before completing the transaction. Any additional employees added to your account within the billing period will be automatically included in the next billing cycle.
Timora sends a 7-day prior notification before the due date, followed by recurring 3-day email reminders leading up to the deadline.
If payment is not settled within the given period, a 10-day net term will apply. After this grace period, access to the system — including clock-in functions and payroll processing — will be temporarily disabled until payment is completed.